Using the
Collection
Each open
collection is displayed in a “collection viewer” window. You open a collection
by using the Open or Open Recent choices on a collection
window’s File menu. Any collections that
were open, when you last exited from Recollector, will be automatically
reopened the next time you run Recollector. If a collection being opened is
password-protected, you will be prompted to supply the password before the
collection viewer is displayed. The collection viewer window is a tabbed
display, with three tabs (or “views”) for looking at your collection: (1) List;
(2) Image Gallery; (3) Item Details. The List View and the Image Gallery let
you browse through the many records in your collection; the Item Details let
you examine all the information for a single record. Click on a tab to switch
to the corresponding view. You can also switch views using the Options menu.
The List
View
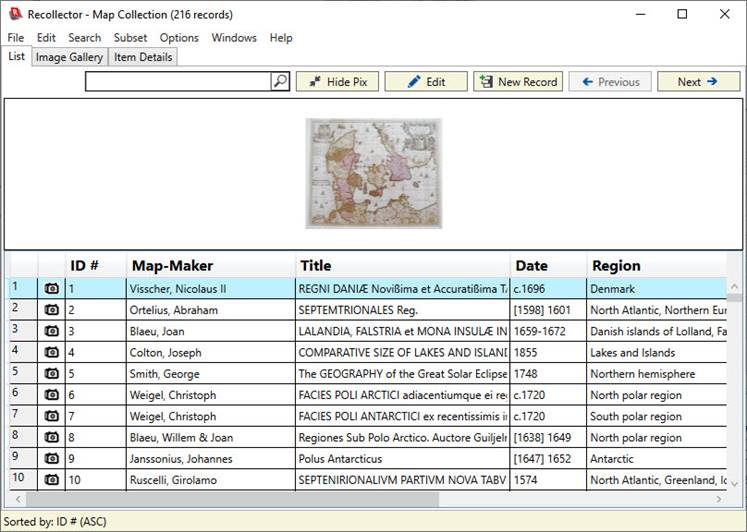
Each row in the
List View corresponds to an item in your collection. One row is always shown as the currently
selected row. Use your mouse to click any row to make it the selected row. (Or
use the Up and Down arrow buttons on your keyboard, or the Previous and Next buttons
shown at the upper right part of the window.)
The camera icon (![]() ),
shown in the second column of the list, indicates that the corresponding record
contains at least one image.
),
shown in the second column of the list, indicates that the corresponding record
contains at least one image.
See the section of
the User’s Guide on Selecting
Fields for the List View
to see how you can specify which fields (and their order) appear in the List
View.
A “thumbnail
banner” is shown at the top of the List View. The thumbnail banner shows
thumbnails for all the selected record’s images. Click on a different row in
the List View and that record’s image(s) will be displayed in the thumbnail
banner. The images in the thumbnail banner are clickable: Click on an image and
the selected image will be displayed in a newly opened image viewer
window. The thumbnail banner can be
hidden by clicking the Hide Pix
button in the header bar, and, if hidden, can be shown again by clicking the
same button (now named Show Pix).
The size of the
images shown in the thumbnail banner is controlled by a preference on the Images tab of the Preferences
Dialog.
The Image
Gallery
The Image Gallery
tab gives you a visual way to browse the items in your collection. Like the
List View, all your collection items are shown in the Image Gallery, but
instead of a tabular set of rows, the Image Gallery displays a grid of
thumbnail images, one for each item in the collection. Even items that have no
images are shown in the Image Gallery, but a note (“[No image]”) is displayed.
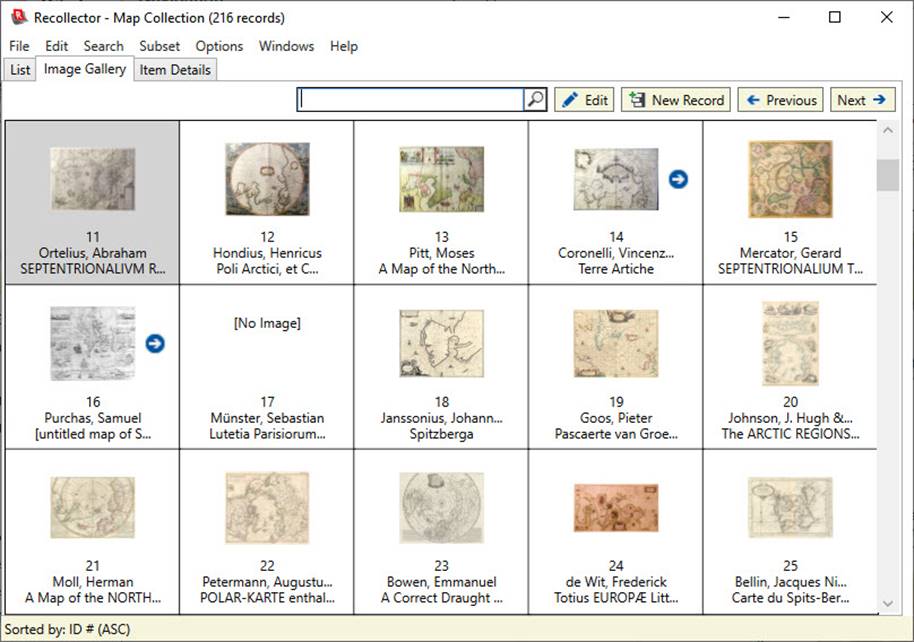
Just like the List
View, the Image Gallery is scrollable, so you can browse through all the items
in your collection. Also, just like the List View, the currently selected
record is highlighted, here with a light gray background. In the Image Gallery,
only one thumbnail image is displayed per record, but if a record contains
multiple images, then an arrow button is shown, as can be seen in two cells in
the top row of the example above. Clicking on the arrow swaps the current image
for the next image found in the record. (A second arrow, at the left of the
image, will be shown when you are displaying the second or subsequent image for
a record, and you can use this arrow to move back to an earlier image.) If a record has multiple images, normally the
first image found is the one that will be initially displayed. But you can
designate one image as the one that you prefer as the initially displayed
image. See the section on Entering data into
Image/Audio/Video fields
for a description of how to do this.
Click on a cell in
the Image Gallery grid to make it be the selected record. Hold down the
<Ctrl> key and click on the cell to bring up an image viewer window.
The size of the
images shown in the Image Gallery is controlled by a preference on the Images tab of the Preferences
Dialog. The default size is 150 pixels (length or width of
the longest side of the thumbnail).
Below each image in the Image Gallery are shown field values for the
corresponding record. By default, the first three fields in the List View are
selected as the fields whose values are shown. However, you can create a field
profile which will override the default behavior. Create a
field profile named Image Gallery (be sure to name it exactly as shown here, as two
words with initial capital letters ‘I’ and ‘G’); the first six fields included
in the Image Gallery field profile
will be the fields whose values are displayed below the thumbnails, regardless
of which fields are displayed in the List View. The Image Gallery field profile may have fewer than six fields; if it
has more than six fields, only the first six fields will be used. Note that the
program will truncate any field values that are too long to be included on a
single line within a cell of the Image Gallery.
The Item
Details
To look at the
full details for the currently selected record, switch to the Item Details. You
can do this by clicking on the Item
Details tab or by double-clicking on the desired row in the List View or
the desired cell in the Image Gallery.

You can group sets of fields in the Item Details
display, by requesting additional spacing between groups of adjacent fields.
This is done using a special field profile named Item Detail Groups. This is described in more detail in the Field Profile section of the User’s Guide.
Menus
Following is a description of the various functions that can be performed from the collection viewer window, all of which are available from the menus. (In some cases, operations are invoked from options menus, brought up by a right-button click on the window. These options are described below.) Some functions are only enabled in one or two of the views (List, Image Gallery and Item Details); others are available in all three views.
File menu
New Collection – Use this choice to create a new collection. You will be given a choice of creating a new collection from one of the built-in templates or from an existing Excel spreadsheet or delimited text file. See the description of Defining a New Collection.
Open – [shortcut: <CTRL>-O] Use this choice to open an existing collection by navigating to, and selecting, its collection file on the disk. This is the file in XML format (with filename extension “.xml”) that is the on-disk storage for the collection data. If you choose a file that corresponds to a collection that is already open, that collection’s viewer window will be brought to the front. If you choose a collection file that isn’t currently open, it will be opened and a new collection viewer for that collection will be created and brought to the front. If you choose a file that is not a valid Recollector collection file, an error message will be displayed.
Open Recent – This menu choice opens a sub-menu that shows a list of previously (and currently) open collections. The list is ordered with the most recently used collection at the top and the least recently used collection at the bottom. Selecting an item from the sub-menu is the same as opening the collection using the Open menu choice: If the selected collection is already open, its window will be brought to the front; otherwise the chosen collection will be opened and its newly-created collection viewer will be displayed.
Print –
[shortcut: <CTRL>-P] From the Item Details, the single entry is printed.
The order of the fields is identical to the on-screen order. This order can be
changed via the Item Details: Field Order choice of
the Options menu. If the Item
Details contains one or more thumbnail images, these will also be printed as
images.
From the Image Gallery, the entire Image Gallery is printed. If a subset
is currently in effect, only the items in the subset will be included (just as
in the on-screen Image Gallery). For records that contain multiple images, only
one image will be shown in the printed version of the Image Gallery. Because a
printed page usually will be of a different size than the on-screen collection
window, the printed Image Gallery may include a different number of columns
than the on-screen Image Gallery.
From the List View the entire list is printed in tabular format. If a subset is currently in effect, only the
items in the subset will be included (just as in the on-screen List View). The
printout does not wrap columns which don’t fit on a single page. For this
reason, using Print from the List
View is only useful when you have set up your List View to only display a few
columns. For a better approach to printing all of your collection data,
consider using either of the next two menu choices (Print Details for All Entries or Generate Printed Report).
Print Details for All Entries – This choice will produce an Item Details printout for each row in the list. Each item will begin printing on a new page. Normally this will include all the records in your collection, but if you have been looking at only a portion of your maps (Subsetting in effect – see the Subset menu choices, below), only the records included in the current Subset will be printed. The order of the printed records will match the current sort order.
Generate Printed Report (with wizard) – Use this choice to produce a customized, compact printed report for your entire collection (or for a subset). A “wizard” will step you through the choices you need to tailor the report to your needs. This is described fully in the help for Generating Printed Reports.
Generate Web Site (with wizard) – Use this choice to generate a set of web pages that comprise a collection web site for your entire collection (or for a subset). A “wizard” will step you through the choices you need to tailor the web site to your needs. This is described fully in the help for Generating a Collection Web Site.
Summary –
This choice will bring up a window showing you a brief summary of your
collection. The summary gives the name and filename of the collection, the
location of the collection’s Image Directory, the date and time that the
collection was last modified, and totals for any currency and number fields. If
a subset is in effect (see Subsetting the Collection),
then the subset name will be shown and the record count and
currency/number-field totals will be shown for both the subset items and for
the full set of records in the collection.
Note: Totals for currency fields
will be treated in a special way if your collection contains a number-type
field whose name is Quantity*
(exactly as shown here, with capital ‘Q’ and an asterisk as the last character
in the field name). If a Quantity*
field exists, then its value will be multiplied by the currency field’s value
in calculating totals. This allows you to handle the case of a collection with
multiples, by having just a single record for the set of duplicate items, with
the number of duplicates specified in the Quantity*
field. The currency field should reflect
the price/value for just a single item, and the computation of totals will be
done by multiplying the currency value by the Quantity* value. (If Quantity* is left blank in a record, a
default value of 1 will be assumed.)
Collection Summary Document: You can optionally maintain a document, in
MS/Word format (with a filename extension of .docx or .doc), that
contains whatever additional summary information you wish to maintain about
your collection. Most of the information maintained by Recollector is at the
record level, in the data fields for each record. But if you have information
about the collection as a whole (for example, notes about the history of your
collection, or plans for the eventual disposition of the collection), this
collection summary document provides a place for this. A button labeled View/Edit Collection
Summary, at the bottom of the Summary window, will open this document for
you to view or to edit. If it does not
already exist, you must manually create the collection summary document. The document’s name is the same as the
collection file’s name (which is displayed at the top of the Summary window),
but with a filename extension of .docx or .doc, rather than .xml. You can use any text-editing program that
supports the MS/Word document format to do the initial creation of this
file. (In addition to Microsoft Word, .docx
or .doc files can be created with programs such as LibreOffice or Google
Docs.) The collection summary document
must be located in the collection’s Image Directory folder. (This guarantees
that the collection summary document will get included in any backups that are
made of the collection.) If you click on
the View/Edit Collection Summary button and Recollector cannot find the
expected document file, a warning message will be displayed that explains why
the requested document could not be opened.
Export to Excel – This choice will invoke Excel, create a new spreadsheet, and copy the data from the collection viewer into the spreadsheet. (Only the fields selected for display in the List View will be copied. Adjust the set of fields displayed in the List View by the List: Field Selection choice of the Options menu, or by using a Field Profile.) This choice will only function correctly if Microsoft Excel® is installed on your computer. Before the export is performed, the program will ask whether you want formatting codes (e.g. for italic text, or for specifying a hyperlink) to be stripped out of text fields. By default, the formatting codes are stripped out. However, if you anticipate importing the data back into Recollector at some later time, you may want to retain the formatting codes, in which case you should indicate this when prompted.
Export to File – This choice will write out a tab-delimited or comma-delimited ASCII file (also known as a CSV-format file) from the List, with the field names in the first row. You will be prompted for the name and location of the destination file. (Only the fields selected for display in the List View will be copied. Adjust the set of fields displayed in the List View by the List: Field Selection choice of the Options menu, or by using a Field Profile.) Before the export is performed, the program will ask whether you want formatting codes (e.g. for italic text, or for specifying a hyperlink) to be stripped out of text fields. By default, the formatting codes are stripped out. However, if you anticipate importing the data back into Recollector at some later time, you may want to retain the formatting codes, in which case you should indicate this when prompted.
Export for download to the Recollector App – This choice will prepare a download file for sending a copy of your collection to a smartphone or tablet device, where it can be viewed using the Recollector App, the companion app of the PC version of Recollector. Versions of the Recollector App are available for Android phones and tablets and for Apple’s iPhone, iPod touch, and iPad. See the descriptions of Viewing your collection on an Android device or Viewing your collection in an iPhone, iPod touch or iPad.
Import Records from Excel (not available in Item Details) – See the description of Importing Data into the Collection.
Import Records from File (not available in Item Details) – See the description of Importing Data into the Collection.
Close – [shortcut: >CTRL>-X] Use this choice to close the collection
viewer. If this is the only collection viewer window that you have open,
closing it will also exit from Recollector. Because this choice explicitly asks
to close the collection, the collection will not be automatically re-opened the
next time you run Recollector. (Use the Exit
menu choice if you want to exit from Recollector in a way that will
automatically open the same collections the next time you run the program.)
If the collection has unsaved changes,
you will be prompted as to whether to save unsaved changes. Closing the collection using the close button
(the “X” button at the upper right corner of the window) works in the same way.
Because this choice explicitly asks to close the collection, if closing
the collection causes Recollector to exit (because the collection being closed
is the only open collection), the collection will not be automatically
re-opened the next time you run Recollector. (Use the Exit menu choice if you want to exit from Recollector in a way that
will automatically open the same collections the next time you run the
program.) This does not apply to closing the collection with the “X” button: In
that case, if this is the only open collection, causing Recollector to exit
after the window is closed, Recollector will remember the collection and will
automatically re-open it the next time the program is run.
If you have more than one open collection viewer window, closing one of them
will cause one of the other collection viewer windows to be brought forward,
and Recollector will continue to run.
Save – [shortcut: >CTRL>-S] Use this choice to save the current state of the collection to disk. If you are doing a large amount of data entry or editing, it is a good idea to periodically save your changes so that you will not lose your work in the event of a power failure or any other kind of unexpected interruption. You can also turn on auto-save, which will cause your collection to automatically be saved back to disk on a regular interval. This is described more fully in the description of auto-save, in the Preferences Dialog. Note: The Save menu choice will be disabled if the collection has not been changed since the last save. You can also tell whether or not the collection has been changed by the collection window’s title bar: An asterisk will be displayed at the end of the title if the collection has been changed since the last save.
Revert – This choice undoes any as-yet unsaved changes. Depending upon when in the session you request to revert, the program may prompt you as to whether you want to revert to the most recently saved version of your collection, or to the version of your collection as it was just before you began the current session. After performing a revert operation, Recollector redisplays your collection, always beginning in the List View, regardless of the previous view you had been using.
Set Password – Use this choice to specify that your
collection is to be saved using password-protected encryption. See the full description of encrypting and password-protecting your collection.
Managed Access – Use this choice to set up Managed Access for your collection. This is a method of safely sharing work on a collection database among a group of cooperating people. See the description of this facility in the section on Managed Access.
Backup Collection – This choice allows you to back up the currently open collection. See the full description of backup.
Restore or Copy a Collection from Backup – This choice lets you restore a collection from a backup made using the Backup Collection facility. You can also use this choice to copy a backed-up collection to a new computer (or to a new location on the same computer). See the full description of restore.
Export Collection Template – Use this choice to create a new (XML format) collection file, but one that has no data records in it. The file created by this menu choice will have information about the structure of your collection (field definitions, collection name, currency and dimension units, field profiles and picklist definitions), but none of the data. This newly created collection file can be used for:
· Creating a new collection whose structure is, at the outset, identical to that of the current collection. If you want to create a new collection similar to an existing one, then it is easier to start out with the structure of the existing one than to create a new one from scratch. Simply open the written-out template file as a new collection (by using Open on the File menu of a collection window). You can then modify the newly opened collection in any way you want (e.g changing the collection’s name, its fields, etc.) and begin to add data records to it.
· Sending a database “schema” for your collection to somebody else who also owns a copy of Recollector. This lets you share your database setup with others, without having to also share the actual contents of your collection.
Note: There are several parts of a collection (other than the data) that are not included in a template. These include X-link and P-link definitions. Also, no Image Directory specification is included in a template, since a new user of the template will typically want to specify the location of their own Image Directory.
Exit – Use this choice to terminate the program. All open collection viewer windows (and their associated image windows and adding/editing windows) will be closed. Recollector will remember which collections were open when you choose Exit, and the next time the program is run those collections will automatically be opened. Note: If you have made changes to any open collections since the last time the collection was saved, the program will prompt you as to whether to save your changes before closing. If auto-save is enabled (see auto-save) the program will automatically save your changes without any prompt.
Edit menu
Select All (Item Details only) – [shortcut: <CTRL>-A] Selects the entire contents of the window (typically in preparation for doing a Copy operation).
Copy (Item Details only) – [shortcut: <CTRL>-C] Copies the selected text to the clipboard (typically for subsequent pasting into some other application).
Edit Record – [shortcut: <CTRL>-E] This choice lets you edit the currently selected record. See the description of Editing Data.
Add New Record(s) – [shortcut: <CTRL>-N] See the description of Adding Data.
Add a Copy of Current Record – [shortcut: <CTRL>-K] See the description of Adding Data.
Enable Multi-Record Delete (List View only) – This is a toggle, which, when turned on, allows you to select more than one row. This allows you to delete multiple rows at one command, rather than having to delete records one at a time. When multi-record delete is enabled, the following actions can be used to select rows:
· Click: Selects the clicked-on row and deselects all other rows. (This has the same effect as clicking on a row when not in multi-record delete mode.) The clicked-on row also becomes the “anchor” row for subsequent <Shift>-click or <Shift+Ctrl>-click operations.
· <Ctrl>-click: Toggles the clicked-on row. If the row was previously unselected, it now becomes selected (in addition to whatever other rows were previously selected), and it also becomes the anchor row. If the row was previous selected, it becomes unselected, unless it was the only selected row, since the program requires that at least one row be selected at all times.
· <Shift>-click: Selects the block of rows between the clicked-on row and the anchor row.
· <Shift+Ctrl>-click: Toggles all of the rows in the block between the clicked-on row and the anchor row. If this would cause the de-selection of all rows, the anchor row is left selected, since the program requires that at least one row be selected at all times.
Multi-record delete mode does not stay in effect after most other operations. Other operations, such as switching to Item Details or adding or editing data records, will turn off multi-record delete mode if it is on. Therefore, you should only turn this mode on immediately prior to selecting rows and then choosing Delete Record(s) from the Edit menu. If you turn multi-record delete mode off after having selected multiple rows, but without performing a delete, the list will revert to having just a single row selected.
Delete Record(s) – [shortcut: <CTRL>-W] This choice will delete the currently selected record(s) from your collection database. You will be prompted to confirm that you really want to delete the selected records. There is no undo capability (other than revert, which undoes all changes made since the last save), so if you mistakenly delete a record, you may have to enter it again. If multi-record delete mode has been enabled (only available in List View; see the description of the prior menu item), and multiple records in the list have been selected, all the selected records will be deleted. Multi-record delete mode will be turned off automatically when the deletion operation is completed.
Fill in Empty ID # Values (List View only) – This choice can be used to automatically generate numeric values for the ID # field of any records that currently have an empty (blank) value for this field. The ID # field (which, by default, is named ID #, but which you may have renamed) is normally filled in during data-entry, or it may have been filled in if you created your collection by importing data from a file or a spreadsheet. But, under certain circumstances, the ID # field in one or more records may be blank. For example, if you added additional records to your collection by doing an Import Records from File or Import Records from Excel operation, and your imported data did not contain a column for the ID # field, then that field will be empty for all the imported records. This menu choice will automatically assign ascending numeric values to the ID # field of any record that does not have a value for this field. The numeric value assigned to the first qualifying record will be one more than the highest numeric value yet defined in the ID # field of records currently in the collection, or 1 if none of the collection’s records currently have a numeric value. This will guarantee that the newly assigned ID # values will not match any existing ID # values. This operation only applies to records currently in the List View, so if a subset is currently in effect, only records in that subset (with empty ID # fields) will have numeric ID # values applied.
Modify Fields or Image Directory – This choice lets you make changes to the set of fields that are defined for the collection. You can create additional fields, including derived fields, or modify (rename or change the data type) or delete existing fields. You can also change the name of the collection or the default units for currency and dimension fields. In addition, you can specify or change the Image Directory to be used for the collection. The dialog used to modify fields and the image directory is described more fully in Modifying a Collection’s Fields & Specifying the Image Directory.
Search menu
Find – [shortcut: <CTRL>-F] In the List View or Image Gallery, you will be prompted for a text string and a field to search in, with options to search in all fields, or in all fields displayed in the List View. In Item Details mode, you will just be prompted for a text string. You can also specify a case-independent or case-dependent search, and you can specify whether to ignore cases where the search text only matches part of a word (“Full Words Only” matching).
In List View or in the Image Gallery, you have two options for searching:
· Search for next matching record – this option will search forward, from the currently selected record, looking for the next record that meets the search criteria. That record will then become the selected record. The search will wrap back to the top if the last row is reached. If a subset is active, only the records in the active subset will be searched.
· Create a temporary ‘search subset’ with just the matching records – this option will find all the records that meet the search criteria and the set of items shown will be reduced to just those matching items. A note, in the lower right-hand corner of the window, will remind you when a search subset is in effect. Recollector also has a separate, more elaborate, and capable subsetting capability, which is described fully in a separate chapter on Subsetting. The ‘search subset’ capability is a somewhat quick-and-easy way to perform subsetting temporarily. The chapter on Subsetting describes both kinds of subsetting.
You will be told if no match is found.
In addition to using Find from the Search menu, each of the three views (List View, Image Gallery and Item Details) has a quick-search text entry box near the top of the page. You can type a text to search for, and then either hit the <Enter> key or click on the magnifying-glass icon at the right of the quick-search text box. This will perform a search without bringing up the Find dialog. When searching using the quick-search text box, the search will be performed case-independently, and full-word matching will not be used. The quick-search text box is really just a short-cut equivalent to bringing up the Find dialog, entering the search text, choosing to search in Any field, turning off the two check boxes (Match Upper/Lower Case and Find Full Words Only), and choosing Search for next matching record. If you type a text into the quick-search box and then hit the <Enter> key, the program will search, starting at the currently selected record. If that record contains the search string, the currently selected record will not change. You can also click on the magnifying glass button, which lets you search again, and which always begins its search in the record following the currently selected one (or wrapping around to the first record if the currently selected record is the last record). On the Item Details tab, searching using the quick-search text box does not search from one match to the next; rather, all the matching texts within the record are highlighted at once, with a yellow background.
In the Find dialog in the List View or in the Image Gallery, the program can help you specify a search value when you are looking for a particular value in a single field that is a short text or one-line text field. Type a few characters into the Search for text-entry box and then hit the ESC key on your keyboard. This will cause the program to identify values in the selected field, in all records in the collection, whose beginning characters match the characters you typed in (case-independent matching is done). If just one matching value is found, it will automatically be filled into the Search for text-entry box. If there are two or more matching values, a pop-up window containing a list of all matching values will be shown, and the value you select from this list will be filled into the Search for text-entry box
In Item Details mode, all found instances of the search string will be highlighted (with a yellow background). If you have searched for a string in the List View or the Image Gallery, and you then immediately switch to Item Details, all matching instances of the found string in the record will be highlighted.
Find Again (not available in Item Details) – [shortcut: <CTRL>-A] Repeats the previous search, continuing from the next record after the currently selected record. If the end of the list is reached, the search will wrap around automatically and continue searching from the first record. This menu choice is not available for Item Details since the Find menu choice finds all the matching instances in the record at one time.
Find and Replace (only available in List View) – Use this choice to search for a text in a particular field, across all rows, and request replacement with a different text. See the section below, that describes Find and Replace in greater detail.
Clear Search Subset – Use this choice to turn off a search subset, if one is currently active. The note regarding the current search subset will be cleared from the lower right corner of the window, indicating that no search subset is currently in effect.
Go to ID # – [shortcut: <CTRL>-G] Use this choice to jump directly to the record with a particular ID # value.
Back to Previous Record – [shortcut: <CTRL>-B] In Item Details mode, use this choice to go back to the previous record, after you have jumped to a new record by clicking on an jump-to link. This operates similarly to the “Back” button in a Web browser, returning you to the previous page after you have clicked on a link to jump to a new page. In List View or the Image Gallery mode, this menu choice will only be enabled right after you have used the Go to ID # menu choice (see previous item). Choosing Back to Previous Record will return you to whatever record had been selected before you used the Go to ID # menu choice.
Subset menu
Select a Subset – Use this menu choice to limit the collection list to just the subset of records that meet a specified condition. For a full description, see Subsetting the Collection.
Show Full Collection (no subsetting) – Use this menu choice to return the collection list to the full set of records in the collection database. This choice turns off any subsetting that had been in effect. For a full description, see Subsetting the Collection. This menu item also turns off the search subset, if one was in effect. (See, above, under Find, on the Search menu, for a description of the ‘search subset’ capability.)
Manage Subsets – Use this choice to create new subset definitions, or to modify or delete existing subset definitions. For a full description, see Subsetting the Collection.
Display Subset Definition – This choice will bring up a window in which the record-selection criteria for the current subset definition are displayed.
Options menu
Sort Order – Use this menu choice to modify the sorting order of the collection’s records. See the description of Sorting the collection.
Reset to Default Sort Order (List View only) – Use this menu item to quickly return the collection’s sort order to its default state. This menu choice is only enabled if the collection has a default sort order defined. (The default sort order for a collection is specified in the Sort dialog. See the description of Sorting the collection.)
List: Field Selection – Use this menu choice to modify the set of fields that are displayed in the List View, as well as to modify the order in which the fields are displayed. See the description of Selecting Fields for the List View.
Set Field Selection from Profile – Use this menu choice to set the fields displayed in the List View from a “field profile”. Choose this menu and a sub-menu will be displayed listing the available profiles. If no field profiles are defined, this menu choice will be disabled. You create new field profiles using the Manage Field Profiles dialog (also accessed from the Options menu). See the full description of field profiles in Creating and using Field Profiles.
Item Details: Field Order – Use this choice to change the order in which fields are displayed in the Item Details window, as well as in the data-entry/editing window. A dialog box will be shown with a list of all the fields, in their current order. Select field names in the list and use the buttons at the right to move the selected fields up or down in the list. You can also use drag-and-drop to rearrange the items in the list.
View Collection List / View Image Gallery / View Item Details – These three choices are the equivalent of clicking on the List, the Image Gallery, and the Item Details tabs, respectively. They also provide shortcuts (<CTRL>-L and <CTRL>-D, respectively) for switching to the List View or to Item Details using the keyboard.
Limit Item Details to Only Fields Shown in List – This choice is a toggle. Normally this toggle is not selected (no check mark shown next to it on the menu), in which case the Item Details display shows all fields that contain any data. If there are certain fields that you wish to hide, even in Item Details mode, you can do this by first altering the List View to include only those fields that you also wish to display in the Item Details. (Use either List: Field Selection or Set Field Selection from Profile, described above, to alter the set of fields shown in the List View.) Then turn this toggle on. Note that the order of the fields shown in the Item Details display will also be the same as that shown in the List View if you select this option. This allows you to create a completely custom Item Details display (choice of items and their order) by creating a field profile (see Creating and using Field Profiles for details on how to do this) that has just the fields you want to see, in the order you want to see them. Then switch the List View to use this profile (using Set Field Selection from Profile, described above) and turn the Limit Item Details to Only Fields Shown in List toggle on. Now, when you switch to the Item Details display, you will see the custom field selection/order that you desire.
Start Slide
Show (Item Details only) – Selecting this menu choice causes the Item
Details to advance from one record to the next, automatically, after a
specified interval. The interval is
specified on the Item Details tab of the Preferences
Dialog. The term “slide show” is
used loosely, since what is being shown are not slides or pictures, but rather
the data as shown in the Item Details.
But the auto-advancing effect is similar to an automated slide
show. Once started, the slide show will
stop when you pick Stop Slide Show from the Options menu, switch to the List View or
Image Gallery, ask to edit or add records, or when you invoke many of the
choices available on the menus (particularly those choices that bring up
dialogs). To re-start the slide show,
just re-select this menu item.
If you want to present a slide show of the images in your collection, you can
use the slide show facility along with several other facilities to produce the
best effect. You can create a field
profile that only includes your image-type field(s), and then you can set the
List View to use this field profile, and, also, turn on the Limit Item Details to Only Fields Shown in
List toggle (described above). That way, the Item Details will only display
your images. Since the images shown are
thumbnails, you might also want to go to the Images tab of the Preferences
dialog and set the maximum width and height of thumbnails to be
larger-than-normal values (values up to 1000 are allowed).
Manage Field Profiles – Use this choice to create, modify or delete field profiles. See Creating and using Field Profiles for a full description.
Manage Picklists – Use this choice to create, modify, delete, or assign picklists to fields. When a picklist is assigned to a short or one-line text field, the data entry/editing screen will display a drop-down list (a “picklist”) to allow a field’s value to be entered by simply selecting a value from the list. See the full description of Using Picklists.
Preferences –
Use this choice to set various preferences. See the full description of Setting User Preferences.
Small Font /
Medium Font / Large Font – These choices let you change the size of text
used. Select whichever size you find most comfortable for viewing data in the
collection viewer window. If you have multiple collections open, changing the
font size will change the display in all collection viewer windows. The
fonts used in adding/editing windows also reflect the font size choice. However
the font in any open adding/editing window will not change immediately. You
must close and re-open an adding/editing window in order to get it to display
using the new font size.
These font size choices affect the List View and the Image Gallery, and they
can also affect the Item Details and the data-entry/editing window. But the
Item Details and the data-entry/editing window also have separate preferences
that let you specifically change the font size (and font family) just for use
in those contexts. You can set these
choices (both for font family and font size) in the Data Entry/Editing tab and the Item
Details tab of the Preferences
dialog. As a convenience, the data-entry/editing window lets you access the
editor’s font preferences via its own Preferences
menu choice.
Windows menu
Data Adding/Editing Window – This menu choice is only enabled if the data-entry window associated with this collection is open (either on-screen or iconified). Choosing this menu item will raise the data-entry/editing window above all other windows. This can be useful if the window has gotten hidden underneath other windows on your screen
Collection Windows – This sub-menu gives you access to any of the currently open collection viewer windows. Any collection that you choose from this sub-menu will be brought to the front. Only currently open collections are listed in this menu. To open a collection that is not currently open, use Open Recent on the File menu.
Image Windows – This sub-menu gives you access to a sub-menu listing all of the open image viewer windows. If there are multiple such windows open, they can become obscured by one another or by other windows on your screen. This menu gives you an easy way to bring any particular image viewer window to the top. If no image viewer windows are currently open, this menu choice is disabled. If you have multiple collection viewer windows open, the image window menu lists all image windows, regardless of whether an image window was opened by this collection or by a different collection.
Close All Image Windows – Use this menu choice to immediately close all image viewer windows. If many image viewer windows are open, this is an easier way to clean them up than going to each window separately to close it. This menu choice will be disabled if no image viewer windows are open.
Help menu
Recollector User’s Guide – This menu choice opens the User’s Guide (part of which you are currently reading).
Check for
Updates – This menu choice will open
a browser window that will show you whether you are running the latest version
of Recollector. If you are not
up-to-date, you will be invited to download the latest version of the program.
This check can only be performed if you are currently connected to the
internet.
Purchase License (upgrade from Demo Mode) (only present when running in Demo Mode) – This choice will take you to a web page where you can purchase a Recollector License. Licenses are emailed as soon as they are purchased, and you can use the next menu choice (About Recollector / Product Registration) to register Recollector with the license key that was emailed to you. This choice is only usable if you are currently connected to the internet
About Recollector / Product Registration – Use this menu choice to display a dialog containing information about the version of Recollector that you are currently running, as well as contact information for customer support. If you are running the evaluation version (Demo Mode) of the product, a button on this dialog will let you enter a registration key, to convert the product to a fully licensed, unrestricted version.
Interaction with the Collection Viewer Window in the List
View
In addition to the menu choices, you can use the mouse and keyboard to interact with the collection viewer window in the List View.
- Clicking anywhere on a row will cause the row to become selected (highlighted).
- You can re-order the columns in the List View by clicking-and-dragging on the column header (the row at the top of the list, where the field names are displayed). Drag to the right or left to move a column to a new position. (You can also re-order the columns using the Field Selection dialog, chosen from the List: Field Selection choice of the Options menu.)
- You can change the width of a column in the List View by clicking and dragging, in the column-header row, on the separator line at the right-hand edge of a column. Drag to the left to make the column narrower; drag to the right to make it wider.
- Use the Show [Hide] Pix button to turn the thumbnail banner display on or off. The thumbnail banner displays thumbnails of the currently selected record. You can click on an image in the thumbnail banner to bring up an Image Viewer window, letting you view the image in a larger size. If the record has multiple images, you can flip between the images in the Image Viewer.
- Use the Edit button to edit the currently selected record.
- Use the New Record button to add a new record.
- Use the Previous or Next button to move to the selection to the previous or next record.
- If a subset is in effect, and you have more than one subset defined for your collection, you can use the Previous Subset and Next Subset buttons to cycle through the subsets that you have defined for the collection. (These two buttons will not be visible if a subset is not in effect or if your collection doesn’t define at least two subsets.)
- You can use the up and down arrow keys on your keyboard to move the selection to the next/previous record in the list. The Page Up and Page Down keys will shift the scroll position approximately one page-full up or down, but it will not change the current-record selection.
- Use the Home key to scroll the List View horizontally all the way to the left. Use the End key to scroll all the way to the right. These keys only have an effect if the List View has a horizontal scroll bar due to the view being wider than the horizontal space available in the window.
- Hold down the <Ctrl> key and click Page Up to select the first record in the list. If necessary, the display will scroll to ensure the first record is visible.
- Hold down the <Ctrl> key and click Page Down to select the last record in the list. If necessary, the display will scroll to ensure the last record is visible.
- Click on the Image Gallery tab to switch to the Image Gallery.
- Click on the Item Details tab to switch to the Item Details on the currently selected record.
- Double-click on an item in the list to select the item and switch to the Item Details for that record.
- Pressing the <Enter> key will switch to the Item Details on the currently selected record.
- Right-button clicking on the List will both select the clicked-on record and display an options menu:
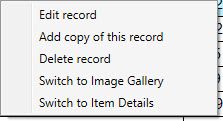
This menu provides choices letting you edit the selected record (equivalent to choosing Edit Record from the Edit menu or clicking the Edit button), adding a copy of the current record (equivalent to choosing Add a Copy of Current Record from the Edit menu), deleting the selected record, or switching to either the Image Gallery or to the Item Details for the selected record.
Using Find and Replace in List View
The Find and Replace dialog (which is only
available from the List View) lets you replace, for a given field, some, or
all, of the occurrences of a particular text.
This is useful when you realize that you have a text (a word, a name, or
a phrase) in many of your data records, and that this text is incorrect. For example, you may have a ‘Manufacturer’
field, and in numerous records you entered the name ‘Broughton’. But you later learn that the correct name for
this manufacturer is ‘Broughton & Sons’.
It would be cumbersome to have to search and find, and then manually
edit, each occurrence of ‘Broughton’ in the records of your collection. Use Find
and Replace to easily correct the text globally. Choosing Find
and Replace brings up the following dialog:
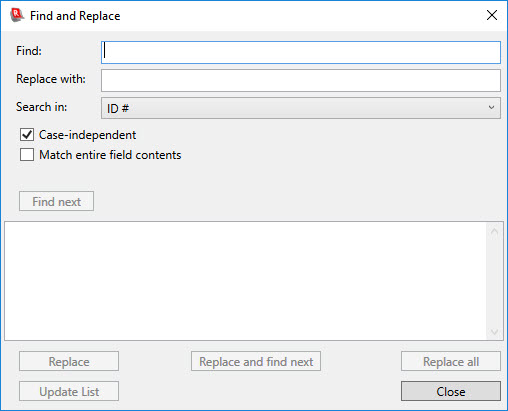
Enter the text you
want to modify in the Find text-entry
box and enter the text you want to replace it with in the Replace with text-entry box. (You can leave the Replace with
text-entry box empty if you want to simply eliminate occurrences of the Find
text, without replacing the eliminated text.) Choose the field in which you want to search
from the Search in drop-down
list. (Note: Find and Replace does not let you replace values across multiple
fields; only one field at a time can be modified. If you want to modify multiple fields,
operate on one field at a time, and then select a different field from the Search in drop-down list, and
continue.) Use the Case-independent check box to choose whether the program will match
the Find text to all versions of that
text, regardless of lower- or upper-casing. (If Find contains “Smith”, then the program will match this with
“Smith”, “smith”, “SMITH”, etc., if the Case-independent
check box is turned on. If the check box is turned off, only an exact match
with “Smith” will be made.) Use the Match entire field contents check box to
specify whether the Find text must
match the entire contents of the selected field. By default, this check
box is turned off, meaning that a match will be made to the Find text whether it is all or just part
of the field’s contents. In general, you
cannot leave the Find text empty. However, if you turn on the Match entire field
contents check box, then you can leave the Find text empty. In this
case, the program will only find records in which the searched-in field is
empty, and you can use Find and Replace to replace these empty values by
the specified (non-empty) replacement string.
Once you have
entered your search and replace criteria, click the Find next button. The
program will begin searching from the currently selected record, looking for
records that have the Find text in
the selected field. If the program reaches the last row without having found a
match, it will loop back to the first row and continue the search. Once all rows have been searched, if the Find text is not found in any record,
this will be reported. But if a match is
found, then the first match found will be displayed:
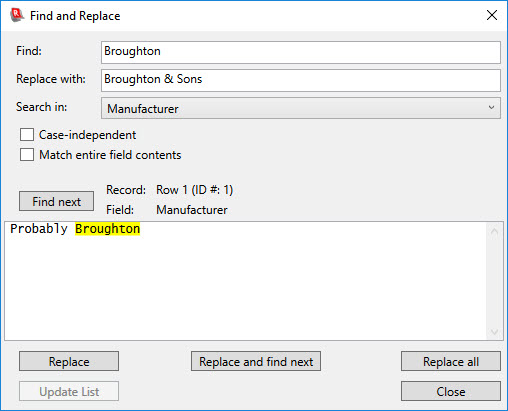
The display shows
which record the match was found in (row number in the List View, and the value
of the ID # field), and the text is
shown, highlighting the matching text. (When searching for empty values – by
leaving the Find text empty – no highlighting will be shown; the text
box will just be empty.) At this point you can:
·
Click Find next again, to move on to the next
matching occurrence (which could be in the same record – if the field’s
contents contain the Find text more
than once – or in a different record).
No change to the data will be made.
·
Click Replace, which will replace the
highlighted text by the Replace with
text. The updated field contents will be
shown.
·
Click Replace and find next which will replace
the highlighted text by the Replace with
text, and will then search for the next occurrence of the Find text.
·
Click Replace all. The program will warn you
that all occurrences of the Find
text will be replaced by the Replace with
text in the selected field, in all the data records in the List View. If you choose to proceed, the substitutions
will be made, and the program will report how many changes were made. A progress dialog will show the process of
scanning the collection and making replacements.
·
Click Close to exit the Find and Replace dialog.
The following notes
describe some of the features and limitations of the Find and Replace capability of Recollector:
·
After
doing a Replace or Replace and find next, the data in your
collection will be immediately updated.
However, the display of the data in the List View will not be updated
immediately (because, with a very big collection, this can cause an annoying
delay each time a replacement is made). The List View will be refreshed when
you close the Find and Replace
dialog. The program will warn you (just once) about this deferred refreshing of
the List View. You can also click the Update
List button to cause immediate updating of the List View. This button will
only be enabled if there are pending updates to the List View based on
replacements you have made. (If you do a Replace
all, the List View will be refreshed as soon as the replacement operation
is complete; you do not need to wait until you close the Find and Replace dialog in this case.)
·
The
program will not find text that includes more than one style. So, for example, if you had a record with the
text “undiscovered” (with just the first two letters underlined), then a
Find text of undiscovered will not match this. When a match is found for a text
that is all of one style, but not the “normal” style, then the replaced text
will also have that style. So if a match is found to a word that is all in
bold, then after replacement, the new text will also be bold.
·
The
program will not find text that overlaps the beginning or end of a hyperlink.
So, for example, if you had the text “web site for
information” (where the word site was
a hyperlink), then if the Find text
were web site, it would not match,
since one part of the field’s value (“web”) is not hyperlinked, while another
part of the value (“site”) is.
·
The Find text and the Replace with text are limited to a single line. You cannot match text that spans more than
one paragraph (in a multi-line text field), nor can you introduce a paragraph
break in the replacement text.
·
The
program will not find text that is in the hidden part of hyperlinks. For
example, if you had a W-style hyperlink with the URL http://www.harrypotter.com, and you had a Find text of harrypotter,
the text in the hidden URL component of the hyperlink would not be found.
·
If the Case-independent check box is turned on,
this does not affect the case of the text used for replacement. When you do a
replace operation, the Replace with
text is used, without modification, even if the Find match was case-independent and the case of the found text
differs from that of the specified Find
text.
·
The Replace all operation warns you that the
modifications about to be made cannot be undone. However, even though there is no specific Undo choice, you can use Recollector’s Revert capability (on the File menu), to throw away a set changes
made by doing a Replace all (or a
series of individual Replace
operations).
·
The Find and Replace dialog only operates on
the rows currently shown in the List View.
So, if a subset is in effect, only those records in the subset will be
affected. To ensure that all records in
the collection are operated on, turn off subsetting before doing Find and Replace.
·
When
replacing values in a field that is associated with a picklist, you must use
full-field searching (by turning on the Match
entire field contents check box). Also, if the associated picklist is
strict, the replacement value must be one of the picklist’s values. If not strict, the program will warn you if
you try to use a replacement string that is not one of the picklist’s values,
but you will be able to proceed anyway.
Interaction with the Collection Viewer window in the
Image Gallery
In addition to the menu choices, you can use the mouse and keyboard to interact with the collection viewer window in the Image Gallery.
- Clicking anywhere in a cell will cause that cell to become selected (highlighted with a gray background).
- Holding down the <Ctrl> key and clicking on a cell will both select the cell and bring up an image viewer window with the image.
- Clicking on the blue right-arrow and left-arrow buttons (shown only for records that have more than one image), will change the displayed image to the next (or previous) image.
- Use the Edit button to edit the currently selected record.
- Use the New Record button to add a new record.
- Use the Previous or Next button to move to the selection to the previous or next record.
- If a subset is in effect, and you have more than one subset defined for your collection, you can use the Previous Subset and Next Subset buttons to cycle through the subsets that you have defined for the collection. (These two buttons will not be visible if a subset is not in effect or if your collection doesn’t define at least two subsets.)
- You can use the arrow keys (up/down/left/right) to move the selection to a different record in the list. The Home or End keys will move the display to the top or bottom of the gallery, but will not change the current selection. The Page Up and Page Down keys will shift the displayed area of the Image Gallery grid approximately one page-full up or down, but will not change the current selection.
- Click on the List tab to switch to the List View.
- Click on the Item Details tab to switch to the Item Details on the currently selected record.
- Double-click on any grid cell to switch to the Item Details for that record.
- Pressing the <Enter> key will switch to the Item Details on the currently selected record.
- Right-button clicking on an Image Gallery cell will both select the clicked-on record and display an options menu:
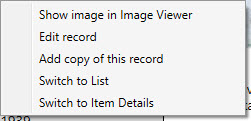
This menu provides choices letting you enlarge the images for the record by displaying an Image Viewer window, edit the selected record (equivalent to choosing Edit Record from the Edit menu or clicking the Edit button), add a copy of the current record (equivalent to choosing Add a Copy of Current Record from the Edit menu), or switching to either the List View or the Item Details for the selected record
Interaction with the Collection Viewer window in Item
Details mode
You may see links – identified by blue, underlined text – in the Item Details window display. These are of two different types:
- Images – Image fields contain links (which may be displayed as either thumbnail images or as text) to digital images. (Image fields can also contain links to audio or video clips.) Image files on your local computer that are stored in any of the standard image file formats (JPG, BMP, GIF, TIFF, WMF, PNG, etc.), will be displayed as thumbnail image links. (If you prefer to not view image links as thumbnails, but prefer to see textual filenames, you can specify this on the Images tab of the Preferences Dialog – accessible via the Preferences menu choice on the Options menu. In the same location you can also specify the size of thumbnail images, which default to a maximum of 150 pixels on each edge.) Click on an image link and the program will open a window and display the image file in it. For local image files the program will open a special image-viewer window. If the record contains multiple images, the selected image will be shown initially. Arrow buttons are shown which can be used to switch to see other images from the same record. The image-viewer window has a slider that lets you adjust the zoom level for the image (from 10% to 200% of its actual size). A Print button lets you print the image (scaled to fit on a printer page), and a Copy button lets you copy the image (full size) to the clipboard, for pasting into other applications. For remote files (or for local html pages), the program will open a web browser window and display the page/image there.
- Hyperlinks – Links in fields other than image fields can be clicked on to provide additional information or capabilities. Some of these links are to other records (so-called “jump-to” links), in which case clicking on the link will change the Item Details display to the indicated record. (See the example in the image, above, of the Item Details window: There is a blue-underlined link to the record with an ID # of 109.) If you click on a jump-to link, the program will search for a record whose ID # matches the one shown in the link, and, if found, will jump to that record in the Item Details window. (See Notes on Special Formatting Capabilities for information on how to enter an ID #, in the data-editing window, so that it will be shown as a link in the Item Details display.) Hovering your mouse over a hyperlink (or an image) will show a tool-tip that describes what will happen if you click on the hyperlink. Other kinds of hyperlinks may do one of the following:
- Display additional information, footnote-style, in a small window at the bottom of the collection window. The information is also displayed in a popup when you hover over such a hyperlink.
- Play an audio or video clip (using Windows Media Player).
- Open a web browser and display a web page.
- Open another application to display a file (for example, a PDF file).
- Use the Edit button to edit the current record.
- Use the New Record button to add a new record.
- Use the Previous or Next button to move to the Item Details for the previous or next record.
- If a subset is in effect, and you have more than one subset defined for your collection, you can use the Previous Subset and Next Subset buttons to cycle through the subsets that you have defined for the collection. (These two buttons will not be visible if a subset is not in effect or if your collection doesn’t define at least two subsets.)
- Click on the List tab to switch to the List View.
- Click on the Image Gallery tab to switch to the Image Gallery.
- Pressing the <Enter> key will move to the previous or next record (depending upon whether the most recent move was to the previous or next record; the program tries to keep going in the same direction).
- Right-button clicking on the Item Details Window will display an options menu:
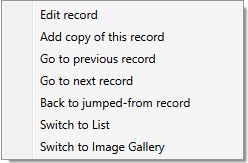
This menu provides choices letting you edit the selected record (equivalent to choosing Edit Record from the Edit menu or clicking the Edit button), add a copy of the current record (equivalent to choosing Add a Copy of Current Record from the Edit menu), moving to the previous or next record, returning to the record that from which you jumped to the current record (equivalent to choosing Back to Previous Record from the Search menu), or switching to either the List View or the Image Gallery.
Back to: Recollector - Home Page