Recollector User’s Guide
Securing your Collection:
Encryption and Backup/Restore
Encrypting and
password-protecting your collection
Collection files can be encrypted, using a user-chosen password. If you choose to encrypt your collection, you will be prompted to supply the password each time you open the collection. An encrypted collection file is in XML format, just like an unencrypted collection file. However, in an encrypted collection file, each of the pieces of data about your collection is encrypted into what looks like meaningless characters in the file. This means that if your computer is ever lost or stolen, your collection data will not be accessible to the person who has it.
When a collection is password protected, Recollector will prompt you to supply the password each time the collection is opened. If you enter an incorrect password, Recollector will let you re-try entering the correct password. After five failed attempts to provide the correct password, Recollector will abort the attempt to open the collection. When you start up Recollector, the program tries to open any collections that were open when you last used the program. If a collection was a password protected one, Recollector will prompt for that collection’s password when the program is started. If the correct password is supplied, the collection will be opened. If you cancel out of the password-entry dialog, Recollector will continue running, but it will not open the collection.
Once a collection is given a password and the collection file is encrypted, you must remember that password to gain access to your collection. There is no way to recover a lost password! There is no way to unencrypt a file or remove password protection without first providing the current password! Therefore, be very careful to remember the password you assigned to your collection. Otherwise your collection data will be useless, and your effort in setting up your collection will have been wasted. For this reason, you should probably not password protect your collection unless you feel that the privacy of your collection data is more important than the risk of losing your data should you forget your collection’s password.
You protect a collection with a password by choosing Set Password from the File menu of the collection viewer window. You can also use this choice to change the password. If your collection is already password protected, you can choose to remove that protection (which will result in the collection file no longer being encrypted) by choosing Set Password from the File menu and clicking the button labeled Remove password protection for this collection.
Notes regarding password-protected collections:
· Password protection is on a per-collection basis. If you have multiple collections, each collection is either unprotected or it is protected by its own password. However, you can choose to use the same password for multiple collections.
· Encrypted collection files are portable between the MS/Windows version and the Mac version of Recollector. A collection encrypted under one version can be transferred to the other system, and opened on that version of Recollector after supplying the original password.
· As with all passwords, it is a good idea to choose a password that is not too short (8 characters or more is a good idea) and not easily guessed by others. There are no restrictions on either the length or on what characters can be used for a collection password. Passwords are case-sensitive: abcd1234 is not the same as ABCD1234.
· Encryption and decryption add work to the process of saving and reading collection files. You will probably notice that saving and opening your collection takes a bit longer when the collection has a password.
· In an encrypted collection file, only the data values for your collection items are encrypted. Other parts of the collection file (metadata, information about picklists, profiles, subset definitions, etc.) are not encrypted. Encrypted collection files are pure text files, in XML format, just like unencrypted collection files. However, if you open an encrypted collection file with a text editor, you will not see readable data values; all data values are replaced by what look like nonsense characters, which are actually the encrypted data.
· When you export your collection for download to the Recollector App, the exported download file is not encrypted, even if your collection file is password-protected and encrypted. This is because the Recollector App does not include the ability to decrypt password-protected data. Therefore, if you are concerned about the security of your collection data, you should delete the exported download file once you have successfully transferred it to your mobile device where the Recollector App is running.
· If you back up your collection (see the next section), a password-protected collection will be backed up with its password-protected encryption. If the backup is subsequently restored or copied, its password will need to be provided before the restored or copied collection can be opened.
· Recollector’s Managed Access facility also uses a password, but this password is separate from the encryption password described here. A collection can have either, both, or neither of these passwords, and if it has both, they are typically not the same password.
Backup
It is always a good idea to periodically back up your collection data. Recollector provides a built-in facility for performing backups of your collection and, when necessary, restoring your collection data from backup or making a copy of your collection from a backup.
You back up a collection by choosing Backup Collection from the File menu of the collection window. If you have more than one collection, you back them up one at a time. Only the currently selected collection is backed up through the procedure described here, so to back up a different collection you must switch to the collection window for that other collection, and then again select Backup Collection from the File menu on the collection window.
The Backup Collection command will bring up the following window:
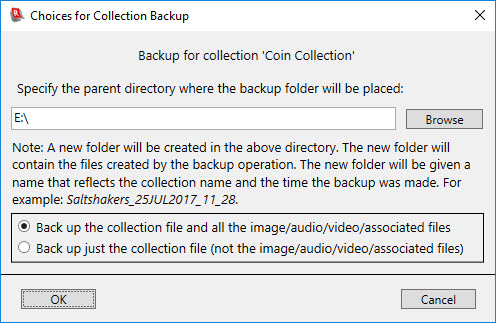
Each backup that you perform will create a new folder (directory) to contain the backup files. In the Collection Backup dialog you specify where this new folder should be created. The very first time you use this backup facility, the destination for the backup folder will be shown as the same folder that the collection file is stored in, but in subsequent sessions the destination will be shown to be whatever was selected the last time you performed a backup. You can use the Browse button to bring up a directory-selection window that will let you navigate to any directory on your system where you want the new backup folder to be created. The example shown above, with a directory on drive E: as the destination for the backup folder, is on a system where E: is a removable flash drive (also known as a thumb drive, memory stick, or USB flash drive). This is a very sensible destination for backup, since the flash drive is independent of your computer’s main hard drive, and therefore the data will be recoverable in the future, even if your hard drive should suffer a complete failure.
In the dialog you also specify whether to back up just the collection file, or whether to also back up all the individual media (image, audio and video) files, as well as any associated files (from M-type and F-type special hyperlinks) used in the collection. If you are planning to copy your collection to another machine, you should back up both the collection file and the media/associated files. If you are just doing the backup for security purposes, you may want to back up only the collection file, particularly if you have previously backed up the other files or are able to recover those files easily from some other source. The files that will be backed up, in addition to the collection file, if you choose to do the full backup, are image files that are specified in any image-type fields, any media file that are specified in M-type special hyperlinks, and any associated files that are specified in F-type special hyperlinks.
When you click OK the backup will begin. If you have chosen to include image and media/associated files the backup may take several minutes to complete, and a progress window will show the course of the backup process.
When completed, the backup will have created a new folder that contains the various backup files, as shown in the Explorer window displayed here:
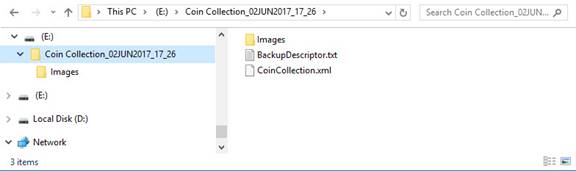
The name of the backup folder is created from the name of the collection and the date and time at which the backup is performed. In the example shown here, the backup was done on June 2, 2017 at 17:26 (5:26 pm) for a collection named Coin Collection, so the backup folder is named Coin Collection_2JUN2017_17_26. Inside the folder are two files:
· An XML file that is simply a copy of the current collection file. This file always has a filename extension of .xml.
· A text file named BackupDescriptor.txt.
If you chose to also back up images, audio, video, and associated files, there will be a sub-directory named Images, inside of which will be individual additional files. (The names of the files in the Images directory are specially generated so that they can be properly restored, if necessary, in a future restore operation.)
The BackupDescriptor.txt file is a text file that contains information needed to correctly restore the collection.
If you plan to use your backup to transfer your collection to a different computer, be sure to copy the entire folder (in the example above, the Coin Collection_2JUN2017_17_26 folder), and not just the collection file within the folder. All the files in the backup folder are needed to perform a successful restore or copy operation.
Restoring or Copying a Collection
Once you have made a backup of your collection, you can use that backup to restore your collection (in case your collection file has been inadvertently deleted or corrupted). You can also use the backup to make a complete copy of your collection on another computer (or to a different location on the same computer). Making a copy of your collection is useful if you have more than one computer, and you want to periodically synchronize your collection information by copying the latest version of your collection data to another computer.
To restore or copy a collection from a backup copy, select Restore or Copy a Collection from Backup from the File menu of a collection window. The following dialog will be displayed:

A file selection dialog will then open. Click the Choose Backup Folder button and navigate to and choose the backup folder that contains the backup data. This will usually be a folder with a name that includes a collection name and date of backup, for example: Coin Collection_2JUN2017_17_26. Next, specify whether you want to perform a Restore operation or a Copy operation. The next two sections on this page describe the subsequent actions, depending upon whether you have chosen to do a restore or a copy. As mentioned above, if you plan to copy your collection, you should do this from a backup that includes the collection’s media (image, audio and video) files. Otherwise the copied collection will not contain any images or audio/video clips.
Restore
Note: Normally you will only need to restore a collection if your collection has been inadvertently deleted, the collection file has become corrupted, the disk on which your collection resides has been damaged, or you have made changes to your collection which you decide are not wanted (and you want to revert your collection to an earlier backed-up state).
If the collection that you are restoring would cause the existing .xml collection file to be overwritten, the program will prompt you of this. If the restored collection included image, media and ancillary files, the restore operation may take a few minutes, and a progress window will show the course of the restore process.
If you restore a collection that is not currently among the collections that Recollector knows about, the restored collection will be added as a new collection to your list of collections. (Note that if you restore a collection from a backup that did not include media files, the images and audio/video clips in the restored collection may or may not be visible/playable, depending upon whether the media files referenced by the collection are in their expected locations. Any image file that is not found will be displayed, in the Item Details view, as the text pathname of the expected file, rather than as a thumbnail image.)
If any parts of the restore operation could not be successfully completed (for example, if a media file was to be restored to a directory that no longer exists), you will be notified of these problems. When the restoration is complete, a window will inform you that the collection has now been restored, and you will be asked if you want to show that collection.
Copy
If you have chosen to make a copy from the backup, you must specify the location and name for the copied collection (.xml) file. Click the Browse button and use the file dialog to navigate to the directory where the copied collection should be placed. You can keep the name of the collection file the same as it was in the backup copy (which is what the file dialog initially displays), or you can modify the name, but you should make sure that the file type (.xml) stays unchanged.
Once the destination collection file has been specified, the program will copy the collection from the backup. In addition to the collection file itself, an images folder will be created in the same directory that contains the new collection file. The images folder will have the same name as the collection file (without the .xml file-type) with _Images appended. So if the new collection file is named CoinCollection.xml, then the program will create a directory named CoinCollection_Images in the same directory. All of the images (as well as any media or ancillary files) from the backup will be placed in this image folder, and the image folder will be set as the Image Directory for the copied collection. (This will be done even if the original collection, from which the backup was made, did not have an Image Directory specified.)
If the original collection, from which the backup was made, included an Image Directory, then any images or audio/video files that were located in the Image Directory (or its sub-directories) will be placed in the corresponding location in the copy. So, for example, if the original collection had an Image Directory named pix, and one of the collection’s images was located in a sub-folder named pix\closeups, then a closeups sub-folder (of the _Images folder) will be created when the copy of the collection is made, and the image will be put into the new closeups sub-folder. In this way, any directory hierarchy that existed in the original collection’s Image Directory will be preserved in the copy. Any images (or media or ancillary files) in the original collection that were not located in the Image Directory hierarchy will be placed in the top-level _Image folder. If there is more than one file with the same name to be put into the same folder by the copy operation (but which had been in different folders in the original collection and so were not causing any name conflict), the program will modify one or more filenames by appending numbers, as necessary (e.g. turning photo.jpg into photo1.jpg) in order to guarantee that all image, media and ancillary files have distinct names. The copied collection file itself will be automatically updated to reflect any such filename modifications.
When the copy operation is completed, the new (copied) collection will be added to the set of collections that Recollector knows about, and you will be asked whether you want to open the newly copied collection. If any parts of the copy operation could not be successfully completed, you will be notified of these problems.
Note regarding
space requirements for backups
Since each backup creates a new folder and new copies of your collection file, you may find that the disk space used by backups grows faster than you might have anticipated, particularly if you include images (and audio or video or ancillary files) in your backups. For this reason you may want to periodically review your backup folders and clean up (delete) some of the older backup folders that you don’t think you would ever want to restore from (since more recent backups are available).
Back to: Recollector - Home Page