Recollector User’s Guide
Modifying a Collection’s Fields & Specifying the Image Directory
The Modify Fields dialog lets you make changes to the
definition of the fields in your collection, as well as make changes to the
definition of the Image Directory, to the currency and/or measurement units, or
to the name of the collection.
This dialog box will appear when you pick Modify
Fields or Image Directory from the Edit menu of the collection
window.
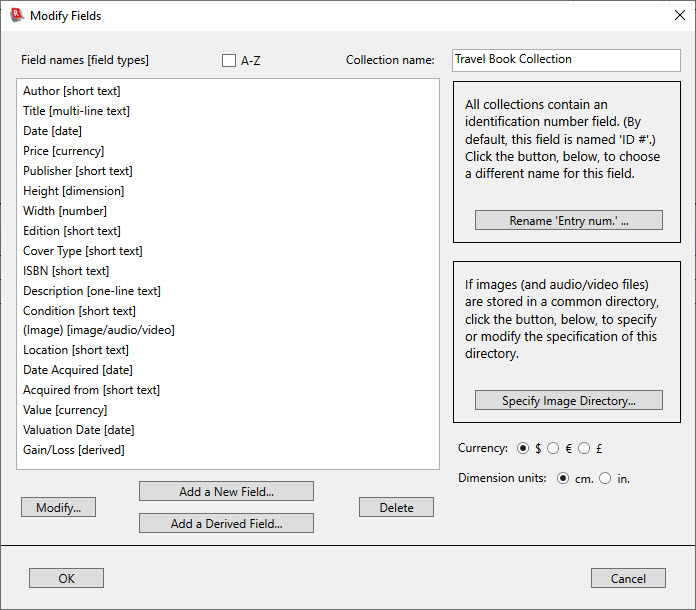
The main list in this window shows the names of all the currently defined fields (other than the ID # field) in the collection database, with the corresponding field type shown in square brackets. The order of the field names reflects the order in which the fields are displayed in the Item Details view. If your collection contains many fields, you may have trouble finding a particular field name in the long list in this window. In this case, turn on the A-Z checkbox above the list, to re-order the field names alphabetically. (The state of the A-Z checkbox is remembered within a session, and if you invoke Modify Fields more than once in a session, the last setting for this checkbox will be restored when you return to this dialog.)
In addition to the fields shown, every database definition includes an identification number field. This field, whose default name is ID #, cannot be deleted, or its type changed, but it can be renamed, by clicking on the button in the upper right-hand section of the dialog. For example, if you are cataloging a coin collection, you might want the identification number field to be named Coin No..
For collections that you have created from a template, the fields shown in the dialog will be the ones specified by the template. The example shown in the illustration above is based on the “book” template; other templates provide different sets of fields.
All data fields have one of the following nine data types:
- [Text – one of:]
· Short text – Text that is quite short (typically just a few words at most).
· One-line text – Text that is longer than short text, but that will still normally fit on a single line.
· Multi-line text – Longer text, which may span any number of lines.
- [Numeric – one of:]
· Currency – Numeric values, in the currency specified by the collection’s currency choice.
· Dimension – Numeric values, in the units specified by the collection’s measurement-unit choice.
· Number – Numeric values (for anything other than currency or dimension values).
- Date – Date values, which may be fully specified dates (e.g. July 14, 1976 or 12‑SEP‑2005), partial dates (e.g. Aug-2000), or whole-year dates (e.g. 1976). If using a Date field to describe ancient material, you can represent a year followed (or preceded) by BC or BCE (e.g.: 350 BC) to represent years prior to the year zero. Recollector will properly recognize these ancient dates for purposes of sorting or comparison. You can also append (or precede) AD or CE with a year (e.g. 500 AD), though this is not needed, since Recollector assumes that any single numeric value represents a year of zero or later.
- Image/Audio/Video – Text that identifies the location of a digital image or an audio or video clip.
- Derived Fields – Fields that are computed from other fields. See the section on Derived Fields, later in this chapter.
Notes on data types:
- The three text datatypes (short, one-line and multi-line) differ only in how they are handled in the data-entry screens, when adding or editing data. When displaying or printing your collection, all text field types are handled identically. In the data-entry window, short text fields are shown as either a short text-entry box (about 25 characters long) or as a drop-down picklist. (Read about Picklists for additional information.) One-line text fields are shown as a full-line text-entry box or as a drop-down picklist in the data-entry window. Multi-line text fields are shown as scrollable multi-line sub-windows in the data-entry window. Certain formatting options (text styles and hyperlinks) are not available for short text fields.
- Currency and dimension datatypes are identical to the number datatype, the only exception being that the labeling for these fields will include the appropriate currency or measurement-unit labels.
- Image fields are used to hold the filenames of digital images or audio or video clips. When an image/audio/video field is shown in the Item Details view of a data record, images contained in it will ordinarily display as thumbnails. (If an image is not accessible on the local computer, it cannot be displayed as a thumbnail; in this case the image field contents, typically a file name, will display as text.) See the description below for more detailed information about image data. If this kind of field contains an audio or video clip, it will be displayed as a clickable link. When clicked on, these links will open the Windows Media Player and play the identified audio or video file.
Adding
a Field
You can add as many fields as you want to your database definition; there is no limit. To create a field, click the Add a New Field button. This will bring up the following dialog box:
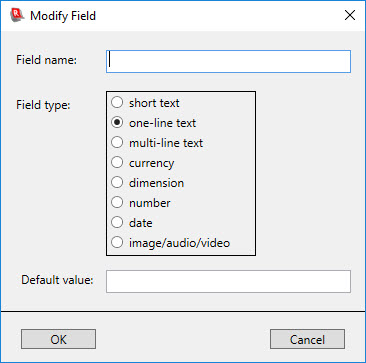
Enter a name for the new field and choose a field type (see the description of the various data types earlier on this page). If you want, you can also specify a default value for this field. The default value is only used when adding new records to your collection. The data-entry window that comes up when you add a new record normally has all the data-entry fields empty to begin with. However, any field that has a default value will have that value pre-filled in the data-entry window. When you have specified a name, type, and (if you want to specify one) a default value, click OK. The new field will be added at the end of the list. The order of the fields, as shown in the Modify Fields dialog, does not reflect the order in which the fields are displayed when viewing your collection. The display order of fields is controlled from the collection window, and is described in Using the Collection. The order shown here, in the Modify Fields dialog, is of no real importance, and just reflects the order in which the fields were initially defined when creating or modifying your collection database.
Special default values for Date fields: If you specify Today or Updated as the default value for a Date field, then, when you add a new record, this field will be initialized to today’s date. If you specify Updated as the default value for a Date field, then, when you edit an existing record and make any changes to the record, when the record is saved, the Date field whose default value is Updated will have its value automatically changed to today’s date. This allows you to have a field that automatically keeps track of when a record was last modified. If you manually change the Date field’s value in the editor, your manual change will be preserved, and automatic updating of the field will not occur during this invocation of the editor. This allows you to manually correct an incorrect last-modified date.
Note: The field name that you specify will be shown both in the List view (at the top of the column that contains that field’s data) and in the Item Details view (each field’s data value is shown preceded by the field name). If you wish to eliminate the display of a field’s name in the Item Details view, you can accomplish this by enclosing the field name in parentheses, here in the Modify Fields dialog. For example, if you name an image field “(Photo)”, then the image thumbnail will be displayed in the Item Details view without the name “Photo” preceding it. This is useful, particularly for image fields, since often a collection record’s image is self-explanatory – it’s the picture of the item – and there is no need to waste space in the Item Details view by also including a field name with the picture. If a field name is suppressed in the Item Details view, because its name is parenthesized, the display of the field name will also be suppressed in printed reports and in generated web site pages.
If you later want to change either the name or the data type of an existing field, select it from the list on the Modify Fields dialog and click Modify. The program will display the same dialog box as shown above, but it will be filled in, with the current name, type, and default value for the field. Make any desired modifications and click OK.
To delete an existing field, select it from the list and click Delete. If you delete a field from your database after you have added at least one data record, any data that had already been entered for the field you are deleting will be lost when the database is next saved. You will be warned of this when you are asked to confirm the field deletion.
Recollector provides a facility for creating derived fields, whose values are computed from simple formulas, using the value of other fields and constants, as well as arithmetic operations on those values. This is like the use of formulas in spreadsheet programs, though, compared to spreadsheet programs, Recollector supports a much simpler set of formulas. Derived fields are only applicable to date and to numeric data (including currency and dimension data). Here are some examples of derived fields that you might want to use for your collection:
· If you have several cost fields (Purchase Price, Shipping Costs, and Restoration Costs), you could create a Total Costs field that shows the sum of the other fields.
· If you have an Amount Paid field and an Appraised Value field, you could create a derived Gain/Loss field that shows the difference between the appraised value and the price paid.
· If you have a Date Acquired field, you could create a derived Time Owned field that calculates how long the item has been in your collection.
· If you have one or more image fields, and multiple images for many records, you can create a derived field that shows how many images are present for a record.
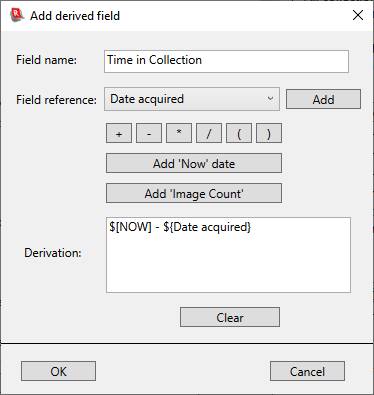
To create a derived field, click the “Add a Derived Field” button. This will bring up the following dialog:

Enter a name for the new field. The name must be different from the names of any other fields (whether ordinary or derived). Then enter a formula in the Derivation text box. Except for constant values, the text in the Derivation box can be supplied by interacting with the controls in the dialog. To enter a field, choose the field name from the dropdown list and click the Add button. (Note that only date, number, currency, and dimension fields appear in the dropdown list. Text fields, image fields and other derived fields are not available for use in derived field formulas.) In the Derivation box, a field reference is represented by a dollar sign followed by the field name within curly braces. For example, a field named Value would appear in the derivation as ${Value}. Enter arithmetic operators by clicking on one of the four operator buttons (+, -, * and /). To represent the current date, as a date value, click the Add ‘Now’ date button. This will appear in the Derivation box as $[NOW]. You can also represent the number of images associated with a record by clicking on the Add ‘Image Count’ button. This will appear in the Derivation box $[NUMIMAGES]. To enter a numeric value, simply place your cursor in the Derivation box, where you want the number to appear, and type in the value. Numeric values can be simple integers (for example 12) or numbers with fractional parts (for example, 0.25). Negative numeric values are not supported, though you can usually get the effect of negative numbers by preceding the number by the minus (-) operator.
Here is an example of a filled-in derived field definition for a field whose value is the length of time that the item has been in the collection:
When you have filled in the derivation, click OK to add this new derived field. The program will validate the formula. If the formula contains any errors, these will be reported, and the “Add derived field” dialog will remain open. Only if the formula can be successfully evaluated will the new field be added.
Derived field values are not part of the saved data in your collection; they are values that are calculated on-the-fly when displaying your collection. For this reason, you do not need to worry about errors in derived field definitions corrupting the data in your collection. No derived field values are saved in a collection file; only the derivation formulas are saved.
Additional notes regarding derived fields:
· Formulas are evaluated from left to right. You can use parentheses (which can be entered using the ‘(‘ and ‘)’ buttons) to control the evaluation order of parts of the derivation expression. For example, to compute a derived full perimeter length, when you have Height and Width fields, you could use the following expression: (${Height} * 2) + (${Width} * 2) If, for a given record, Height is 20 and Width is 8, the resulting derived field would have a value of 56 [(20 * 2) + (8 * 2)]. If the parentheses were left out, with the derivation specified as ${Height} * 2 + ${Width} * 2, then the derived field would have an incorrect value of 96 (20 * 2 + 8 * 2), since evaluation would be performed from left to right.
· If you include a currency field in the derivation, the result of the derivation will be treated as a currency, and it will be displayed like other currency fields. (For example, if your preferences indicate that you always want a two-digit fractional value displayed for currency fields, a derived currency field will be displayed in the same way.)
· If your derivation includes a subtraction between two date fields, or between the $[NOW] value and a date field, the result of the derivation will be displayed as a duration, expressed in years and days (for example, 8 years, 212 days). On the Other Preferences tab of the Preferences dialog, you can specify the words to be used for years and days. If a duration calculation results in a negative value, the duration will be displayed within parentheses. However, you can optionally add a semicolon at the end of the derivation, followed by some text. In that case, the specified text will be displayed when the duration is negative.
· When adding or subtracting a time interval from a date, the numeric value that specifies the interval is interpreted as being in units of days. So to calculate a derived date that is one year later than a particular date field’s value, add 365 (not 1).
· Derived fields can be used for sorting and searching, and can be included in field profiles, subset definitions, printed reports, and generated web site pages. Derived fields are also included when exporting to Excel or to a file, and when exporting for downloading to the Recollector App.
· Totals for derived currency and numeric fields are included in the output produced by choosing Summary from the File menu.
· Derived fields do not appear in the editor, since their values are not entered by the user, but are computed by the program.
Here are some sample derivations (using names for fields that should make it apparent what kind of data field is being used):
Derivation Explanation
$[NOW] - ${Date Acquired} How
long the item has been in the collection.
${Price} + ${Repair Costs} + ${Shipping Costs} Total spent on the item.
${Diameter} * 3.14159 Circumference (of a circular item, such as a watch face).
$[NUMIMAGES] Number of images associated with the item.
${Appraisal Date} + 365 When item is due for reappraisal (assuming a policy of annual reappraisal).
(${Appraisal Date} + 365) - $[NOW]; Overdue Days left until reappraisal is due, or “Overdue” if the reappraisal due date has passed.
${Value per Copy} * ${Number of Copies} Total value of the multiple copies of this item that are owned.
${Total Value} / ${Number of Duplicates} Average value of one object of a set of duplicate objects with a given total value.
${Weight} / 453.592 Weight in pounds, where the original weight is recorded in grams.
(${Height} * 2) + (${Width} * 2) Length of the perimeter of a rectangular object.
The Image Directory (for
collections with digital images or audio/video clips)
If you have digital images of items in your collection (as most collections do), or audio or video clip files associated with items in your collection, and they are mostly located in a single directory on your computer, specify that directory as the Image Directory. There are several benefits to placing all your collection’s images (along with any audio or video clips, if you have them) into a single directory:
· Recollector will help you out when you ask to associate an image (or audio/video clip) with a record in your database: When browsing to locate the image file, the program will start your browsing right in the Image Directory folder, so you will avoid having to navigate through your disk’s folders to locate the desired image file.
· Your collection will become easily portable. To move your collection (to a different location on your computer or to a different computer), you will only need to move two objects: the collection file and the Image Directory folder.
· You protect against accidentally assigning the same filename to two different images for your collection. If all your images are in one folder, all the image files necessarily will have distinct filenames. This is particularly important if you plan to use the Recollector App (for Android smartphones or for iPhone/iPod/iPad), since the presence of duplicate filenames could result in incorrect matching of data records and images when looking at your collection on your smartphone.
The Image Directory folder that you define can be placed anywhere on your computer’s hard drive. However, we strongly recommend that you place the Image Directory in the same folder that holds your collection file. The following diagram shows an example of this recommended arrangement:
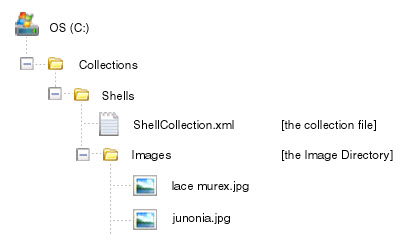
In the example shown above, the collection file (ShellCollection.xml) is in the C:\Collections\Shells folder. The Image Directory (the folder named Images) is also located in the C:\Collections\Shells folder. By placing the Image Directory folder into the same folder that contains the collection file, Recollector is able to locate images via their location relative to the location of the collection file. The primary advantage of this is that it guarantees that your entire collection can be relocated (to a different location or disk on your computer, to a movable USB thumb drive, or to a different computer) without having to make any changes to your collection. Consequently, we strongly recommend that you follow these guidelines, and, when defining the specification for your collection’s Image Directory, the program makes it easy for you to do this.
When you Click on the Specify Image Directory button (or if you are creating a new collection and you choose to specify the Image Directory as the last step of the set-up process), the following dialog box will appear:

Above the boxed area in this window you will see the collection’s currently specified Image Directory, or, as in the screen shot above, you will see [no image directory specified]. You can either choose an existing directory to be your Image Directory, or you can ask the program to create a new folder for this purpose. As mentioned earlier in this section, it is strongly recommended (though not required) that your collection’s Image Directory be located in the same folder as the collection file. As shown in the image above, the parent directory for the Image Directory is initially set to follow this recommendation (note the label: [collection file directory]). The program is also suggesting the name Images for the new directory it will create. Edit this field if you want your Image Directory folder to have a different name. There is nothing special about the name Images; an Image Directory can have any name you want.
You can use the Choose button to select any existing folder as the parent directory for a new Image Directory folder. If you choose a parent directory that is not the directory (or sub-directory thereof) that the collection file resides in, then the full pathname form of the directory specification will be shown and used.
If you want to use an existing directory as your Image Directory, click the Specify an existing directory radio button. You can then click the Choose button to navigate to, and choose, the desired directory.
Additional Notes on Images and the Image Directory:
- The Image Directory is a convenience, allowing you to specify less information (just the filename, rather than the full pathname of the file) when you provide data for an image/audio/video field. If you specify an Image Directory, you can still provide full pathnames for any images (or audio/video clips) that don’t reside in the Image Directory. Therefore you can use simple filenames for files that reside in the Image Directory and full pathnames for files that reside elsewhere.
- You can control some of the characteristics of image display (e.g. size of thumbnails, initial size for full image windows). See the discussion of Image Preferences for more information.
Notes on Audio and Video clips:
Recollector uses the Windows Media Player to play audio or video
files. Therefore you can include links
to files in any media format that is supported by the version of Windows Media
Player running on your computer.
Recollector uses the filename extension of files to determine whether a
file placed in an image/audio/video field is an audio or a video file. In general, all common audio and video file
types (such as .avi, .mov, .mp3, .mpg, .wav) are supported by the Windows Media
Player, though the particular set of supported file types varies somewhat among
the different versions of the Windows Media Player.
Back to: Defining a New Collection
Back to: Recollector - Home Page