Recollector User’s Guide
Generating Printed Reports (with a wizard)
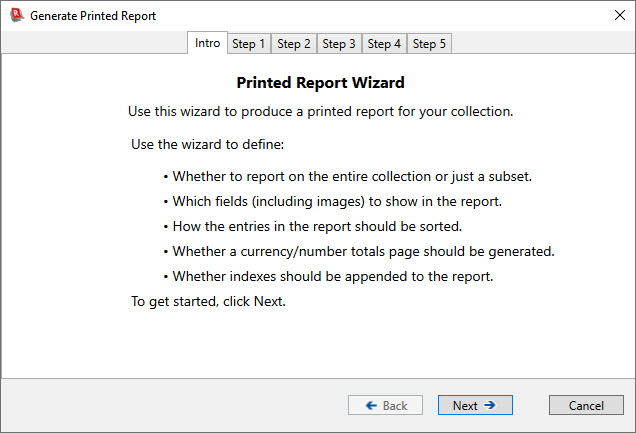
This section describes how you can easily generate a printed report, for your entire collection or for a subset, and customize the report to fit your needs. This is done using a “wizard” invoked by selecting Generate Printed Report (with wizard) from the File menu.
A printed report consists of two or more sections:
1) A cover page.
2) The body of the report, containing entries for all the records. This section will have as many pages as needed, with each page printed compactly, containing as many entries as will fit.
3) [Optional] A summary for currency and numeric fields, listing totals for those fields across all the records in the report.
4) [Optional] One or two indexes, allowing you to index the entries in the report by one or two of the database’s fields.
5) [Optional] A list of the references present in the data. These reflect the X-type special hyperlinks in the data records.
Here is a view of what the main part of the report (the body) looks like, with a thumbnail image of a single page on the left, and a full-sized view of a couple of entries from that page on the right:
|
|
|
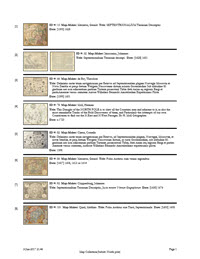
This example shows several features of the report that reflect its compact format:
- Not all fields in the collection database are shown; only those fields that you select will be included in the report.
- Multiple records are printed on a single page. (However, you can specify that each record should begin on a new page.)
- Images are shown as thumbnails, large enough to help identify the object, but small enough to allow a compact overall presentation. You can select the maximum thumbnail size, and the program will scale the images to stay within the specified size limit.
- The images, which represent a field in the database, are shown without field labels, since a label such as "Image" is, in most cases, unnecessary.
- Where there is space to include more than one field on a single line, this is done.
- An entry number (in the left-hand margin) precedes each entry. These numbers are used in conjunction with the report's indexes (described below).
- In the example shown here, the entries are sorted by the ID # field. You can specify any field for sorting the entries in your report.
After you pick Generate Printed Report (with wizard) from the File menu, the wizard window will be shown. The wizard takes you through a sequence of steps, letting you provide the information needed to configure the report you want. The following illustrations show the sequence of pages displayed by the wizard. You move from one page to the next by clicking on the Next button. You can also use the Back button to go back to an earlier step to modify selections made earlier. Only when you get to the last page is there a Finish button that will start the actual processing and printing of the report.
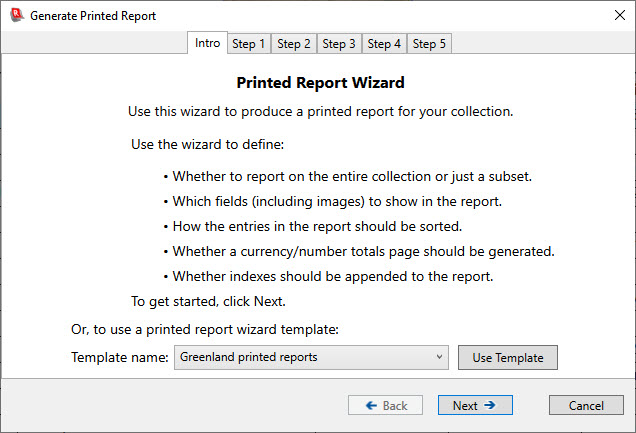
Initial wizard page (introduction):
Wizard page for step #1:
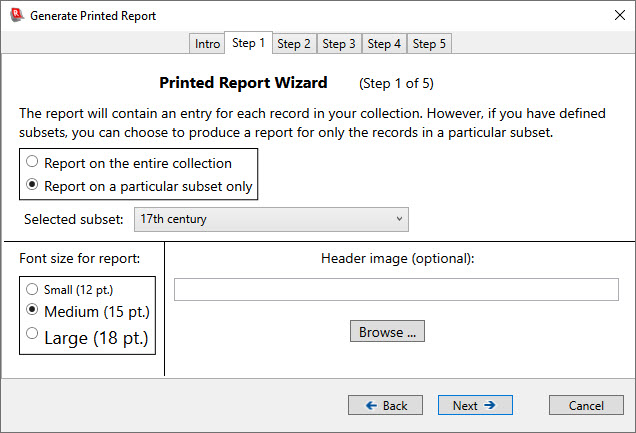
Choose whether your report will cover your entire collection, or just a specified subset. (If you have not defined any subsets for your collection, this page will only allow you to report on the entire collection.) Note: If a search subset is currently in effect, it will not influence the records chosen for inclusion in the report. Only regular subsets can be used to limit the set of records included in a report.
On this step, you can also choose the font size that will be used in printing your report. The font family used in the report will be the same as the display font currently used by the Item Details view. This font can be chosen from the Item Details tab of the Preferences dialog.
You can also specify a header image. This image will be displayed centered in the upper margin of each page of the report (except for the cover page, where the image will be shown near the bottom of the page). The header image allows you to decorate or “brand” the report by putting a standard illustration (perhaps an icon, or a styled text title) atop each page. Because the upper page margin is a thin, horizontal area, it makes sense to choose an image that is horizontal in shape. For example, the following image is appropriately shaped to be used as a header image:

You can use any of the standard image file formats (jpg, gif, png, etc.) for the header image. If the header image is taller than 48 device-independent pixels, it will be scaled to that height, so that it fits in the header margin.
Wizard page for step #2:
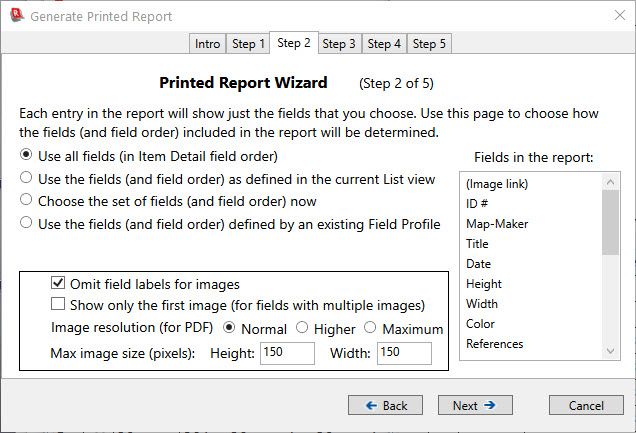
Choose which fields to include in the report's entries, and choose the order in which the fields will be listed within each entry.
- If you select the first radio button, all the fields in the collection will be included in the report, and they will be presented in the same order as they are displayed in the Item Details view of your collection. (The list at the lower right will show the set of fields and their order.)
- If you select the second radio button, the fields that are currently displayed in the List view will be the ones shown in the report. (The list at the lower right will show this set of fields and their order.)
- If you select the third radio button, then you can precisely customize the set of fields, and their order, that will appear in the entries of the report. Click the Choose button (which will be displayed when the third radio button is selected), to bring up a dialog that lets you select the fields that you want. (This dialog is essentially the same as the Field Selection Dialog.) The list at the right will reflect whatever choices you make in the dialog.
- If you select the fourth radio button, a drop-down list will appear below the radio button box, allowing you to select a Field Profile. The fields that are defined by the selected Field Profile will be shown in the list at the right. (If you have not defined any Field Profiles, this radio button choice will be disabled.)
Once you are familiar with generating reports and have found a report format that you are happy with and that you expect to re-use in the future, it makes good sense to define a Field Profile that reflects the set of fields (and their order) that you want to use in your reports. (See the section on Creating and using Field Profiles for details on how to define a Field Profile.) Once you have created an appropriate Field Profile, it is easy to complete this step in the wizard: Just select the fourth radio button and then select the particular Field Profile from the drop-down list.
This page in the wizard also lets you make some choices for images. If your selection of fields contains any image fields, these will be displayed as thumbnails in the report. In general, images are self-explanatory and so there is usually no need to show a label (with the field name) in front of each image. If, for any reason, you do want to include field name labels for images, turn off the Omit field labels for images checkbox.
Normally all images in an image field are shown in the report. However, if you have many images per record, you may wish to produce a more compact report that just shows one image per image field. To do this, turn on the Show only the first image (for fields with multiple images) checkbox. Note: If your collection includes multiple image-type fields, turning on this checkbox will cause each image field to be shown with at most one image, but the record, as a whole, may show more than one image since more than one image field is defined. When this checkbox is turned on, it is the first of multiple images that is displayed. If you are using this feature, you may wish to edit some records to re-order the multiple images within an image field, such that the one image that you prefer to be displayed in your one-image-only-per-image-field report is the first image in the multiple-image set.
If you are generating a PDF file – rather than sending the printed report to a physical printer – then you might want the thumbnail images to retain higher resolution than what is needed for a thumbnail image on the page. This allows you to use the zoom capability of PDF files and retain sharp imagery when zooming to greater than 100%. If you do not choose Higher or Maximum, images will often appear blurry and pixelated when viewed at magnifications above 100%. Choosing Higher will increase the resolution such that at magnifications up to about 300%, images will still retain their crispness. Choosing Maximum will retain the full resolution of the original image, and images will retail their crispness up to the point where magnification produces an image that is the same size as the original (non-thumbnail) image. The default choice is Normal, and this does not provide any resolution above what is present in the thumbnail. If you are sending the report to a physical printer, then you should always choose Normal, since choosing Higher or Maximum will only slow down the production of the report, but it will not produce any better results than what is provided by Normal. It is only when generating PDF files (typically by using the Microsoft Print to PDF capability from the system Print dialog) that Higher or Maximum should be considered. But keep in mind that it will take longer to generate the output, and the generated PDF file will be larger – possibly much larger – than the PDF file generated using the Normal setting.
This page is also where you specify the maximum height and width for thumbnail images in the report.
Wizard page for step #3:
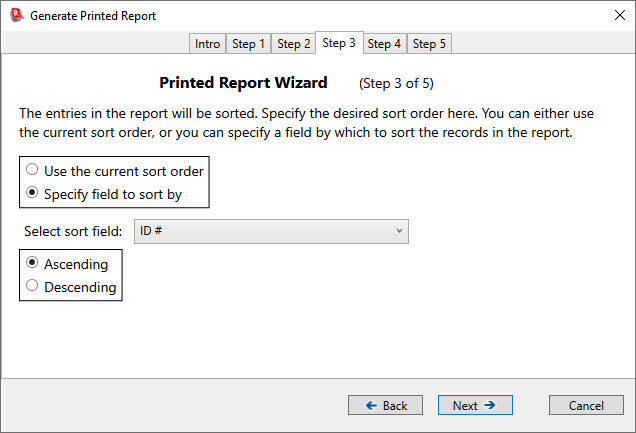
Choose how you want the entries in the report to be ordered. You can either use the current sort order of the List View, or you can choose any field as the sorting field (whether or not the field is one of those selected, in the prior step, for inclusion in the report’s entries), as well as choosing ascending or descending order.
Wizard page for step #4:
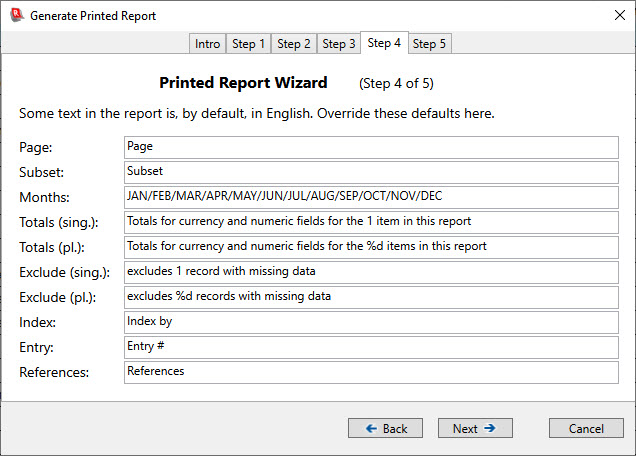
Most of the text in your report will derive from the text content of your
collection: the collection name, the field names, and the actual data values in
your fields. But there are several bits of text that appear in the report that
are generated by the program. These bits of text are in English. This step of
the wizard lets you replace those bits of English by text in whatever language
you want (or by differently worded English words and phrases). Not all these
bits of text are used in every report. The Subset text is only
used if you are reporting on a subset. The Totals and Exclude texts
are only used if you request a currency/numeric-field summary page (described
in the next step) to be included with the report. The Index and Entry texts
are only used if you request one or more indexes to be generated for your
report (described in the next step).
A few of these translation texts have specific requirements, and if the
requirements are not met then the original, English text for that element will
be used. The requirements are:
- Months - There must be exactly 12 abbreviations/names for months (in natural month order), separated by forward-slash characters.
- Totals (pl.) and Exclude (pl.) - The string must contain, within its text, a two-character %d specification. This will be replaced at run time by the appropriate number of records.
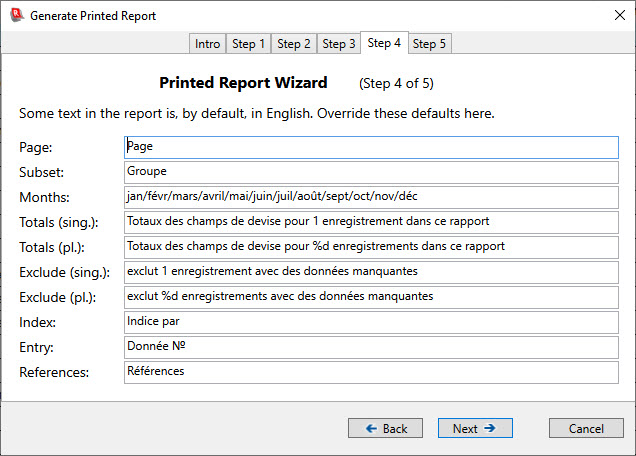
The image, above, shows the default, English, values for these text elements. You can change one, any, or all, as you desire. Here is an example of a (possibly clumsily translated) set of French values, that somebody who wanted to produce reports entirely in French might use:
Wizard page for step #5:
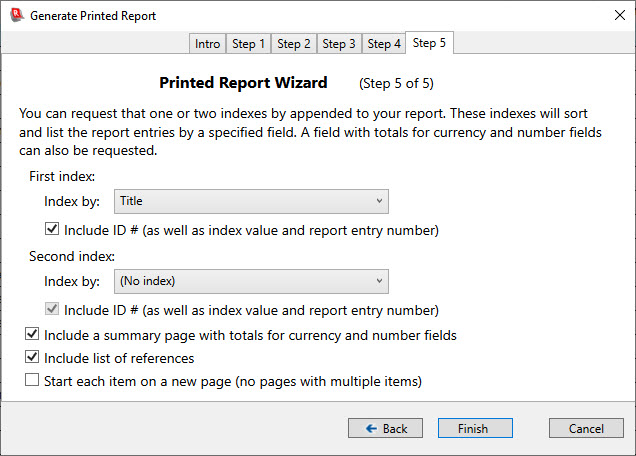
If you want your report to contain indexes, specify that here. Each index will be in the form of an alphabetized list, one line per entry, showing the value of the chosen index field, along with the corresponding entry number in the report and the page of the report on which the entry begins. (Each entry in the report is numbered in the left-hand margin, as can be seen in the example at the top of the page.) You can also request that the index show the value of the ID # field (in addition to the index field and the entry number). The following image shows part of a page containing an index:
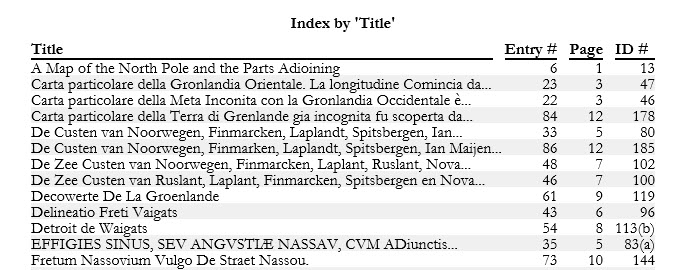
Note that if an entry’s value for the index field is too long to fit on a single line, the index entry truncates the text and appends ellipses (…).
Below the index choices on this page in the wizard is a check box that lets you specify that a summary page be included in your report. On this summary page the totals for all currency-type and number-type fields will be listed. (Only currency-type fields and number-type fields that are among the fields chosen for inclusion in the report will be shown. If you have a currency or number field that was not selected for inclusion in step #2 of the wizard, that field’s total will not be listed.) The totals are computed across all the records included in the report, so if you are reporting on a subset, the totals are just for those records that are included in the subset.
Note: Totals for currency fields will be treated in a special way if your collection contains a number-type field whose name is Quantity* (exactly as shown here, with capital ‘Q’ and an asterisk as the last character in the field name). If a Quantity* field exists, then its value will be multiplied by the currency field’s value in calculating totals. This allows you to handle the case of a collection with multiples, by having just a single record for the set of duplicate items, with the number of duplicates specified in the Quantity* field. The currency field should reflect the price/value for just a single item, and the computation of totals will be done by multiplying the currency value by the Quantity* value. (If Quantity* is left blank in a record, a default value of 1 will be assumed.) The multiplication by the Quantity* field value is only applied to currency-type fields, not to number-type fields.
The currency/number-field summary page is printed immediately after the record-by-record section of the report and just before the indexes.
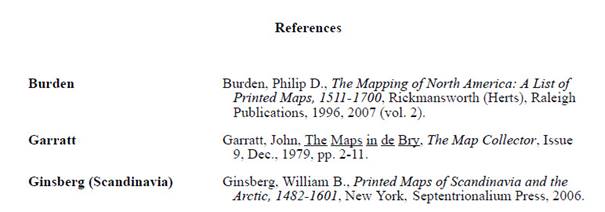
If your data includes references that are implemented as X-type special hyperlinks, you can include a listing of all these references as part of the report. This is essentially a bibliography, assembled by finding all texts that are linked, using X-type hyperlinks, to an extended description. The list is ordered alphabetically by the key used in the X-type link. Note: This list is only generated for those X-type links for which the visible text is the same as the key. (As described in the section on special hyperlinks, it is recommended that the visible text for an X-type link be the same as the key. Any X-type links for which the visible text is not the same as the key will not be included in the list of references.) An example of the beginning of a References section of a report is shown below:
The references section is printed as the last section of the report, after the summary page and any indexes.
An additional check box at the bottom of this page in the wizard lets you request that each record start on a new page in the report. By default, the program will put more than one record on a page, as long as the last record on the page still fits entirely on the same page. But if you want each record to be printed on its own page (or pages, if the record doesn’t fit on a single page), then turn on this check box.
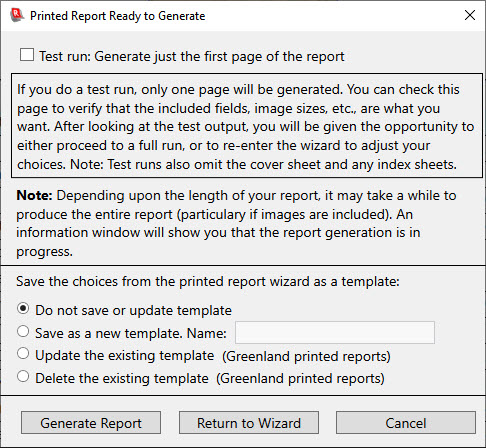
Generating the report
After you have gone through the pages of the wizard and made your choices, click the Finish button. The program will ask whether you want to proceed to a full run, or whether you would like to generate just one page, as a test of the choices you have made. In addition, you will be given the option of saving the choices you made in the wizard as a named template.

As you can see from the information displayed in this dialog, if you request a test page, then only the first page of the report (excluding the cover sheet and excluding the currency/number-field summary page and any index pages) will be printed. After printing the test page, the program will ask you whether to go ahead and execute a full run, or whether to re-enter the wizard to make adjustments to your choices. If you choose to go back into the wizard, all of the choices will be as they were when you previously completed the wizard's steps, so you will only need to make selections for anything that you now want to change. On pages where no changes are needed, just click Next to move to the next page, and repeat until you get to the last page and can click Finish.
See the section, below, on Report Wizard Templates for information on how to save and re-use the choices you made in the wizard.
A few hints for generating printed reports:
- As noted on the dialog, above, it may take some time to generate the entire report, especially if you have included images (since it takes the computer a while to re-size each image to the requested thumbnail size). A progress dialog will be displayed that shows how the report generation is progressing.
- Since the report sends its output to a printer, you can use any printer that has been set up for your system. For example, if you have a “virtual” printer that generates PDF (e.g. Microsoft Print to PDF) rather than sending output to a physical printer, you can easily generate a PDF file for your entire collection.
- If your printer supports duplex printing (printing on both sides of the page), this is useful in reducing the amount of paper needed when generating a long report.
Report Wizard Templates
The wizard lets you specify many attributes of the report. Once you have used the wizard to fine-tune the specifications for your report, you might want to save all these choices for the future. If you anticipate generating a new report in a month, it is very unlikely that you will remember, a month from now, all the choices you made a month ago, and it would be nice to avoid the trial and error that you would have to do to get the report to come out with the same formatting that you had figured out the previous time. This is where a template comes in: Once you have the report configured, via the wizard, exactly as you want, you can save this configuration as a named template. To do this, click the Save as new template radio button (as shown in the previous image), and type in a name for the template. When you then click either the Generate Report button or the Return to Wizard button, Recollector will save all your wizard choices into a template that is saved as part of your collection.
The next time you go to print a report for the collection, the first step of the wizard will look a little different:
At the bottom of the page is a dropdown list of the report templates that you have created for this collection. (There may be just one template in the list, but Recollector lets you create as many different report templates as you want for a collection.) To use a template, choose it from the list and click the Use Template button. You will be taken right to the Printed Report Ready to Generate dialog:
Back to: Using the Collection
Back to: Recollector - Home Page