Adding and Editing Data
To add new data records to your collection, select Add New Record(s) or Add a Copy of Current Record from the Edit menu. Alternatively, click the New Record button at the upper right of the collection window. This will bring up the data-entry (and data-editing) window:
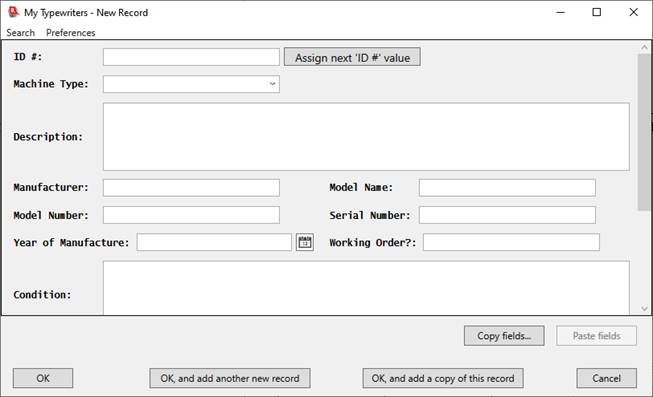
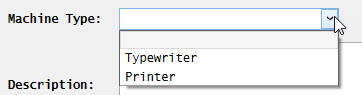
If any of your fields are defined as having default values, those default values will be pre-filled in for you. If you chose Add a Copy of Current Record, the data-entry window will have all fields, except for the ID #, filled in, with the values present in the currently selected record. Enter new values into the fields for the new record. You can use the <TAB> key to move from field to field. You can leave blank any field for which you have no data. Some fields (like Machine Type in the example shown above), may have picklists associated with them, in which case there will be a drop-down list of choices; click on the angle button (at the right end of the field) to access the picklist:
A picklist may be “strict,” in which case the field must either be blank or contain a value that exactly matches one of the values on the picklist. If the picklist is not strict, you can enter a value that is not in the picklist by simply typing it into the field. See Using Picklists for information on how to create and use picklists. Fields can also be associated with ‘multi-select’ picklists, which allow you to fill in one value or multiple values into a single field via a special dialog. This is described fully in Using Picklists.
When you have finished entering data for the record click either OK, OK, and add another new record or OK, and add a copy of this record. If you click OK, and add another new record, the dialog will remain on the screen, but the fields will be cleared out (and fields with default values will be initialized with the appropriate default values), and the window will be scrolled to the first data-entry field in preparation for entering data for another record. If you click OK, and add a copy of this record, the dialog will remain on the screen, with all values unchanged, except for the ID # field, which will be cleared out (since it is expected that each record should have a unique value for its ID # field), or will be incremented to show the next ID # value, if you have the preference for auto-generating ID # values turned on (described below, under Notes). The OK, and add a copy of this record option is useful when you are entering a set of very similar items, as it allows you to enter the second and subsequent items as copies of the prior item, for which you then need only modify the few fields which differ from one item to the next.
Notes:
- You can speed up data entry by having Recollector automatically complete entry into certain text fields. If you type the first few letters of a value and then press the ESC key, Recollector will see whether any existing values for this field in your collection begin with the same letters. If a match is found, Recollector will either fill in the rest of the value (if only one other existing value matches the starting letters you provided), or a popup menu will let you choose from among the existing values that start with the same letters. (If the letters you typed do not match any existing values for the field, Recollector will beep and leave the value unchanged.) This auto-completion capability is only available for short and one-line text fields. It is not available for multi-line text fields, or for non-text fields (dates, numbers, currencies, images, etc.) It is also not available for the ID # field. Picklists (available only for short text and one-line text fields) provide a similar capability, in that they let you choose from a list, rather than having to type in a field’s value. For this reason, auto-completion, using the ESC key, is not provided for fields that use a picklist. You can also have fields that are shown in the editor with a checkbox. This is done using a one-value or two-value picklist. Setting this up is described in the section on picklists.
- Fields whose data-type is “date” will have a calendar button next to the text-entry box. (See the Year of Manufacture field in top image, above.) If you click on the calendar button, a calendar window will be opened:
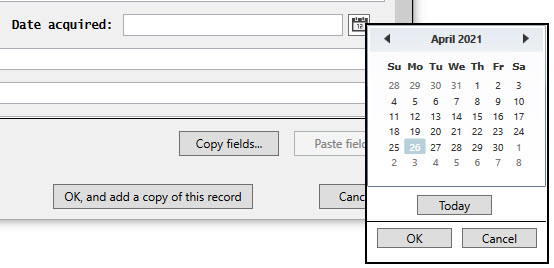
Click on the desired date in the calendar, and the selected date will be filled into the text-entry box for the date field in the data-entry window. Notes on using the calendar:
o The current date (today) is shown with a gray background.
o The selected date (if different from the current date), is shown with a blue background.
o Use the left or right arrows to move to the previous or next month.
o Use the Today button to pick the current day, month and year.
o Click on the month/year, at the top, to jump to a different month by selecting the month in the changed display.
o When viewing the month display, click on the year, at the top, to select a different year. Groups of 10 years are shown and you can use the left and right arrows to switch 10 years at a time.
o If the date field already contained a valid date value, the calendar will initially show that date.
o Click the Cancel button to close the calendar without selecting a date.
o You must either select a date or cancel the calendar (as described in the previous note) before making changes to any other fields in the data-entry/editing window.
o When you choose a date with the calendar, the selected date is formatted, as a text, and put into the text-entry box for the date field. There are a variety of date formatting options available. The formatting option used is based on a preference, that can be found on the Data Entry/Editing tab of the Preferences Dialog (accessed via the Preferences menu choice on the Options menu of the collection viewer window). Whatever formatting choice you select in the Preferences dialog will be used when a date is selected in the calendar. The default formatting choice is the following: July 4, 1976 (i.e. full month name, followed by day-of-month, and full 4-digit year).
- You can resize the data-entry window. By making the window larger, you might find it easier to enter data, because the data-entry fields will be larger (if you make the window wider), or more of the full record can be seen (if you make the window taller). On many computers with reasonably high-resolution displays, you can enlarge the data-entry window such that the entire record will be visible, in which case there will be no scrolling of the window as you move from field to field. Once you resize or reposition the data-entry window, the program will remember its new size and position for the duration of the session, so that when you next open it, it will return to its last size and position. (A subsequent note describes an alternate layout option for wide editor windows.)
- As long as you use simple whole number values for the ID # field (e.g. 1, 2, 3, etc.), then a button labeled Assign next ‘ID #’ value will be shown to the right of the ID # text box. Clicking this button will automatically fill in the ID # text box with a number that is one greater than the maximum ID # value in any existing data record. This simplifies figuring out an appropriate ID # value when adding new data, since you won’t have to look back at your existing data to figure out what the highest current value is. If you use a different scheme for assigning ID # values, one that doesn’t use simple whole numbers, then this Assign next ‘ID #’ value button will not be shown. There is a preference on the Data Entry/Editing tab in the Preferences Dialog (accessed via the Editor Preferences choice from the editor’s Preferences menu, or via the Preferences menu choice on the Options menu of the collection window), that lets you have the assignment of the next ID # value happen automatically when you begin to add a new record to the collection. This preference (Auto-generate ID # when adding records) simply saves you from having to click the Assign next ‘ID #’ value button when adding new records, and it helps to guarantee that each record in your collection will have a unique ID # value.
- If a field has been defined to be long-text, its data-entry area in the window will be a multi-line editor box (like “Description” in the illustration above). The text, as you enter it, will automatically wrap to the next line (when the input position reaches the right-hand edge). In general, where lines are broken and wrapped does not matter, as Recollector will reformat the text when it displays the data in either the List View or the Item Details display of the collection window. To learn about additional text formatting capabilities, including the ability to break long texts into multiple paragraphs, see the Notes on Special Formatting Capabilities, below.
- You can turn on spell checking in the editor. There is a preference on the Data Entry/Editing tab in the Preferences Dialog (accessed via the Editor Preferences choice from the editor’s Preferences menu, or via the Preferences menu choice on the Options menu of the collection window), that lets you turn spell checking on or off. If spell checking is turned on, it is only enabled for one-line and multi-line text fields; it is not available for short text or non-text fields. Place your cursor over a word marked as misspelled (with wavy red underlining), and right-click to bring up the options menu. This will show you suggested corrections to the misspelled word; select one of the suggestions to replace the misspelled word with the selected word.
- To access editing operations (cut, copy, paste) on short text and non-text fields (image, numeric, dimension, date, or currency) right-click on the desired field. A popup options menu will be displayed:
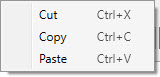
Some of the items in the menu may be disabled, depending upon whether text is selected in the field or whether there is any text on the Windows clipboard.
- To access editing and text styling operations on one-line or multi-line text fields, right-click on the text field to bring up the popup options menu. (One-line text fields associated with a picklist are treated like short text or non-text fields, and only display the short options menu, shown in the previous bullet point.)
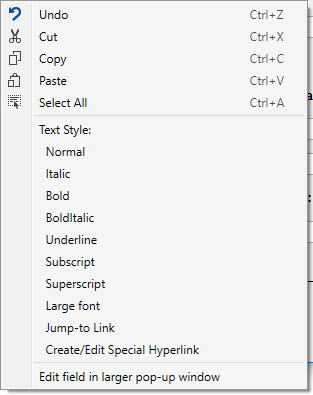
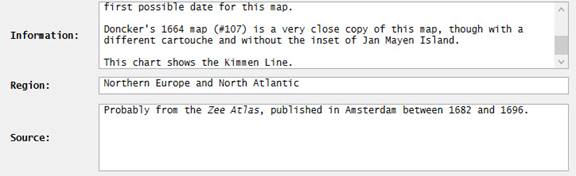
The Text style options (which will only be enabled if you have selected some of the text so that it is highlighted) let you add formatting capabilities to parts of the text. In addition to italics, bold, bold+italics and underlining, you can increase the font size of the selected text [Large font] or you can turn the selected text into subscript or superscript text. (These various text styles are mutually exclusive; you cannot combine, for example, bold and superscript.) The Jump-to Link choice lets you create a hyperlink to another record in your collection database. As an example, the following illustration shows part of the window, with an entry in a multi-line field named Information that includes a reference to another record (#107) in the collection database:
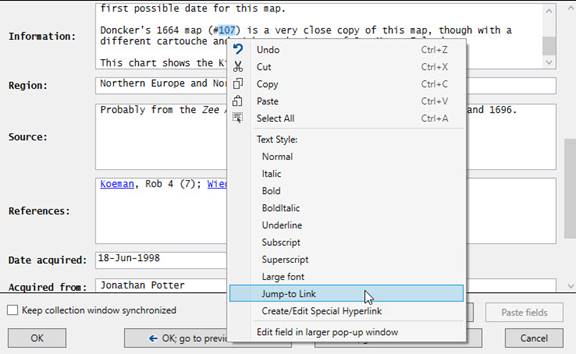
Select the ID # value (“107”) in the text and then right-click to pop up the options menu, and select Jump-to Link from the menu:
This will cause the selected text to become a jump-to hyperlink, shown as underlined blue text:

Later, when you view this record in Item Details mode, you will be able to click on this underlined blue text to jump directly to the indicated record:
![]()
Note: When selecting text to create a jump-to link, select only that text which corresponds to the actual ID # value of the target record. In the example shown here, note that only “107” (not “#107”) was highlighted. This is because the ID # value of the target record in this case is “107” (not “#107”).
The Create/Edit Special Hyperlink choice is used to create or modify one of six special kinds of hyperlink. These are fully described in the section on Special Hyperlinks.
The Edit field in larger pop-up window choice (only shown for one-line and multi-line text fields), allows you to edit very long text in a larger editing window. This larger window, which will pop up if you make this menu choice, makes it easier to work on adding or editing large texts, since you will be able to see a large amount, if not all, of the text at once. The larger text-editing window is also resizable, so you can make the editing window as large as your full screen. The larger window also has the same options menu that is available for text fields, so you can do all the same operations on the text. (When editing a one-line text field in a pop-up window, separate paragraphs in the edited text will be joined together, separated by space characters, so that the results of the editing remain a single line of text.)
- You can change the default 5-line height of multi-line editor boxes. This is done via the Preferences Dialog (accessed via the Editor Preferences choice from the editor’s Preferences menu, or via the Preferences menu choice on the Options menu of the collection window). Any height between 2 and 20 lines can be specified. The chosen height will be remembered, so that even in subsequent sessions the last-specified height will be used.
- You can change the size of image field editor boxes from one-line high (the default) to two lines high. This can be useful if you have many images specified in a single field, or if you have long filenames for the image files. You can turn on two-line height for image fields via the Preferences Dialog (accessed via the Editor Preferences choice from the editor’s Preferences menu, or via the Preferences menu choice on the Options menu of the collection window).
- If you make your editing window wide enough (roughly 10” wide), Recollector may try to rearrange the controls within the window in a more compact format, to increase the likelihood that all the controls will be visible without having to scroll. To enable this behavior, open the Preferences Dialog, choose the Data Entry/Editing tab, and turn on the checkbox labeled Compact layout for wide entry/editing windows (min. 1000 pixels wide). Note: The editor preferences can be accessed directly from the editor window, by choosing Editor Preferences from the Preference menu.
Note concerning normal vs. compact layout: With normal layout, fields are laid out, top-to-bottom, according to the Item Details field order. (See the next bullet point in this section for more information about the layout order of fields within the data-entry window.) With compact layout, fields whose data type uses wide text-entry boxes (one-line text, long text and image fields) are laid out on the left side of the data-entry window, and fields that use short text-entry boxes (short text, number, date, currency, dimension) are laid out on the right side. The text-entry boxes are shorter when in compact mode, allowing more fields to be fit into the visible part of the window. Within each of the two (left and right) sections of the data-entry window, fields are laid out according to the Item Details field order. If the total height of the laid-out fields on the left side is longer than that on the right (or vice versa), fields will be shifted right (or left) to approximately equalize the height of the two sides, thereby minimizing the overall space used and helping to make all fields visible at once.
- The order of the fields in the data-entry window is determined by the order of fields displayed in the Item Details view of the collection window. You can modify this order by choosing Item Details: Field Order from the Options menu. (The order of the columns displayed in the List View of the collection window is controlled separately, by the Field Selection dialog – accessed by choosing List Field Selection from the Options menu – or by dragging columns to new locations in the List View.) If you use a Field Profile to limit the set of fields displayed in the data-entry window (see next bullet point), you will also be affecting the order in which fields are displayed: They will be displayed in the order specified by the Field Profile.
- Normally the data-entry window includes all your collection’s fields. However, if you have many fields, and you are working on your collection in a way that requires you to access only a smaller number of each record’s fields, you can specify that the data-entry window only display the fields in a particular Field Profile (and in the order specified by that Field Profile). For example, if you have fields for valuation and date of valuation, and you want to update the valuations for some or all the items in your collection, you could set up a Field Profile that just included the fields needed to update the valuation information (one or two fields that clearly identify the object, plus the valuation field and the valuation date field). This prevents the data-entry window from being cluttered with many fields that you don’t need to look at or modify for purposes of updating the valuation information. To do this, select the field profile from the Profile for fields to show dropdown list in the bottom panel of the editor. (This selector will not be displayed if your collection has no Field Profiles defined.) When you choose a Field Profile from the dropdown list, the data-entry window will be redrawn, showing only the fields in the selected Field Profile. If the collection remains open, Recollector will remember this choice, so the next time the data-entry window is opened, it will continue to display just the fields from the chosen Field Profile. A warning, in the data-entry window’s title bar, will remind you that you are only being shown a subset of the record’s fields. Select Show all fields from the dropdown list if you want to return to displaying all the fields. (Recollector does not retain the Field Profile restriction choice across invocations of the program. The next time you start up Recollector, when you initially open the data-entry window on a collection, it will always display all fields.) Note: When you are adding new records (rather than editing existing ones), the program will always display the ID # field, even if you are using a Field Profile that does not include the collection’s ID # field. This is to ensure that you have access to the Assign next ‘ID #’ value capability when adding new records.
- You can use copy-and-paste to enter data from another source into the text-entry fields of the data-entry window. After copying from the source (for example, from a text document or Microsoft Word document), click on the text-entry field where you want the data to be copied and type <CTRL>-V (or right-click on the text-entry field and choose Paste from the popup menu). This will paste the just-copied data into the text-entry field. Note that only the actual text, without any formatting characteristics, will be pasted. If formatting (e.g. italics) had been present for some of the source text, you will have to re-specify the desired formatting after the text has been pasted into the data-entry window. However, if you copy from another text field in a Recollector editing window, formatting is remembered and will be reflected when the text is pasted.
- Except for fields associated with “strict” picklists, the data-entry window allows you to type any value into any field. Typing “ABC” into the Price field (a currency field) will not cause an error. If you want some checking done for numeric and date fields, you can turn this on in the Preferences Dialog (accessed via the Editor Preferences choice from the editor’s Preferences menu, or via the Preferences menu choice on the Options menu of the collection window). If you turn checking on, then any numeric (currency, dimension or number) or date field which contains a value that cannot be interpreted as, respectively, a number or a date, will cause an error message to be shown, and you will have to correct the invalid value. The program’s checks for valid numeric and date values are quite lenient: “$5,000 or more” is a valid number (since there is a numeric value, 5000, which can be extracted from this text), and “99-XYZ-2000” is a valid date (since there is at least a year, 2000, which can be extracted from this text). Only values that cannot, in any reasonable way, be interpreted as being the appropriate type will be flagged.
Adding multiple
records (including records with shared values for certain fields)
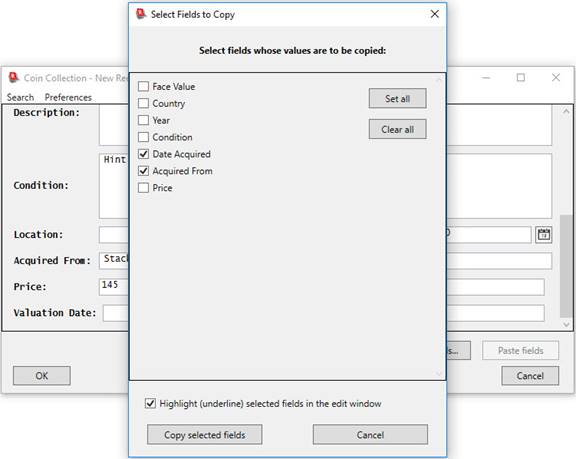
When you have finished entering data for a new record, you can click the OK, and add another new record button if you want to proceed immediately to data entry for another new record. In certain situations you may want to add a number of new records, where some of the fields have exactly the same value across all of the new entries. For example, if you just acquired eight new coins for a coin collection, all acquired at the same time at the same coin auction, then the information about the source will be the same for all eight new records. One option is to use the OK, and add a copy of this record button, which will maintain all the field values (other than the ID # field), and then make changes for the subsequent records. If, however, you only want to preserve the values for a subset of fields as you go from one new record to the next, you can copy the values from the first added record and subsequently paste the values, all at once, into the subsequent seven records. The Copy fields and Paste fields buttons provide the means to do this.
The following images show an example of this process. In the first added record, after having filled in some of the fields (including the fields that you want to replicate across the subsequent new records), the data-entry window might look like this:
Click on the Copy fields button. A dialog will appear that shows those fields in the current record that have data, with a check box for each. (Fields that are blank in the current record are not listed, since there is no data in them to copy. The ID # field is never shown, even if it has a data value in the current record, since ID # values are not intended to be duplicated across multiple records.) Use the checkboxes to select just those fields that you want copied into subsequent records. A checkbox at the bottom also allows you to cause the selected fields to be highlighted, by their field names being underlined, in the data-entry window. This is to help remind you which fields will be filled in when you click the Paste fields button. The following shows what this dialog looks like for the current example, after leaving selected only the checkboxes for the two fields that are to be propagated to the subsequent records, as well as turning on the checkbox requesting field highlighting:
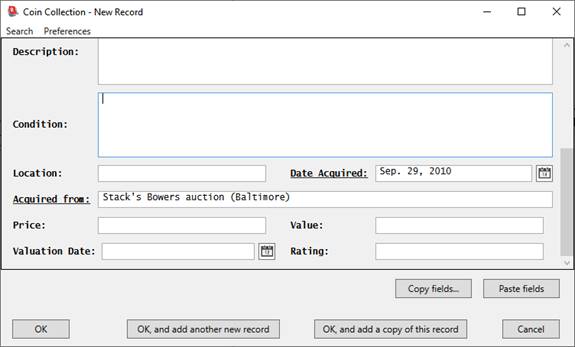
Click the Copy selected fields button and the values for those fields will be remembered. When you proceed to the next record (by clicking OK, and add another new record in the data-entry window), you will notice that the Paste fields button is now enabled. In addition, if you requested highlighting, then names of highlighted fields will be underlined (as shown in the following image). Click the Paste fields button to automatically fill in the copied fields. The following image shows what the data-entry window looks like immediately after clicking the Paste fields button:
Note: Each time you click the Copy fields button and select a set of fields for copying, the prior choice of fields, as well as their associated values, is discarded and replaced by the new choices. If you had previously specified a set of fields for copying, but now want to eliminate the prior choices (so that the Paste fields button is disabled), you can go into the Copy fields dialog, click the Clear all button, and then click the Copy selected fields button. You will be warned that no fields have been specified, but will be given the option to reset the set of saved fields, so that no fields are available for pasting.
Note: Though fields shown using ‘strict’ picklists (include multi-select picklists) are not editable, and normally cannot be pasted into, the Paste fields capability overrides this restriction, and you can fill in values to such fields via Paste fields.
Entering
Data into Image/Audio/Video fields:
Images (and links to audio or video files) are added to a
data record in your collection via the data-entry/editing window, using the
text-entry box for a field whose data-type is image/audio/video. Such fields
are easily identified, because they have a search button ![]() located to the right of the text-entry box.
located to the right of the text-entry box.
If you have defined an Image Directory, then you need only specify the filename (e.g. “10.jpg”) when entering data into an image/audio/video field. The program will automatically append the filename to the Image Directory’s path to produce the full pathname (e.g. “c:\mycollection\mypix\10.jpg”) of the file. If you want to specify a file that is not in the defined Image Directory (or if your image, audio or video files are in various places and you chose not to define an Image Directory), then you must specify a full pathname for the file. The filename should begin with a one-letter drive specification and full path (e.g. C:\…). Any fully specified pathname will be treated as is, and will not be affected by the Image Directory path.
There are two easy ways to specify a link to an image, audio
or video file. The first is to select one or more files in a Windows File
Explorer window and then drag and drop the selection onto the image/audio/video
text-entry field in the data-entry window. The other way is to use the search button ![]() located next to the field on the data-entry
window. This will open a file selection dialog that will let you navigate to
and select one or more files, without having to type in a file name. After
selecting one or more files with either of these methods (dragging and dropping
or clicking the search button and using the file selection window), the program
will check to see whether you have an Image Directory defined. If you do, and if the selected files are not
already in the Image Directory (or a sub-directory of it), the program will ask
whether you want to make a copy of the selected file(s) to put into the Image
Directory. If you choose to make a copy,
the program will check that a same-named file doesn’t already exist in the
Image Directory, and will modify the file name of the copied file, so that it
doesn’t overwrite any existing file. The
program will transfer the name(s) to the image/audio/video field, taking into
account the Image Directory definition where appropriate: If the selected file
or files are in the Image Directory, only the filename will be given (e.g. 123.jpg);
whereas, if the selected file or files are not in the Image Directory (nor in a
sub-folder descended from the Image Directory), and you choose not to make a
copy, the full pathname of the file(s) will be given (e.g. C:\Users\Fred\
Pictures\123.jpg).
located next to the field on the data-entry
window. This will open a file selection dialog that will let you navigate to
and select one or more files, without having to type in a file name. After
selecting one or more files with either of these methods (dragging and dropping
or clicking the search button and using the file selection window), the program
will check to see whether you have an Image Directory defined. If you do, and if the selected files are not
already in the Image Directory (or a sub-directory of it), the program will ask
whether you want to make a copy of the selected file(s) to put into the Image
Directory. If you choose to make a copy,
the program will check that a same-named file doesn’t already exist in the
Image Directory, and will modify the file name of the copied file, so that it
doesn’t overwrite any existing file. The
program will transfer the name(s) to the image/audio/video field, taking into
account the Image Directory definition where appropriate: If the selected file
or files are in the Image Directory, only the filename will be given (e.g. 123.jpg);
whereas, if the selected file or files are not in the Image Directory (nor in a
sub-folder descended from the Image Directory), and you choose not to make a
copy, the full pathname of the file(s) will be given (e.g. C:\Users\Fred\
Pictures\123.jpg).
You can enter more than one filename into a single image/audio/video field. Use a semicolon (;) to separate multiple items. Each one will appear as a separate clickable thumbnail image or clickable link in the Item Details display. If you use drag-and-drop from Windows Explorer, or if you use the file selection dialog invoked with the search button, you can select multiple image/audio/video files in the same directory in one operation. The program will automatically insert the necessary semi-colons between the individual entries.
You can verify that in image has been correctly included by hovering your mouse over the image’s file name. A small thumbnail of the image will be shown.
If you have multiple images defined, then the image that is initially displayed in the Image Gallery is the first image found. If your collection has just one image/audio/video type field, then this will be the first image listed there. If your collection has more than one image/audio/video type field, the program will look in each of these fields until it finds a field that contains an image, and that is the image that will initially be displayed in the Image Gallery. You can override this behavior and choose one image to be the image in the Image Gallery that is initially displayed. To do this, insert a plus sign before the file name. In the following example, the third of the three images (both sides.jpg) is the one that will initially be displayed in the Image Gallery:
recto.jpg; verso.jpg; +both sides.jpg
Image files that you link to on your local computer can be of any of the common kinds (JPG, BMP, GIF, TIFF, WMF, PNG, etc.), though the program does not support JPEG2000 images. All of these common image types will be displayed as thumbnails in the Item Details view and will be shown as large-size images when you click on the thumbnails. In general, JPG format images are the most efficient, so if you have a choice of what format to save your images in, JPG format is recommended.
Notes on Special Formatting Capabilities:
Within multi-line text fields, inserting carriage return within the text instructs the program to format this text as multiple paragraphs, when displayed in the Item Details view of the collection window. This allows very long texts in a field to be broken into paragraphs, to make a more readable presentation in the Item Details display. Note that when entering text into a multi-line text box, the program automatically folds the text into multiple lines. But if you explicitly type a <Return> character (on many keyboards, this is done with the <Enter> key), the program adds a new line, with a visible blank area between the previous text and the new text.
As an example of the various formatting capabilities, if you entered the following three sections of text (with a <Return> typed between each of the sections) into a multi-line text-entry box for a field named Information:
|
This map was described in an article entitled Explorer’s Maps in the Golden Age of Discovery that was published in the festschrift Josef Hofnägel – 50 Years of Geographical Glory. Another copy of this map, but one not published in the festschrift, but rather three years earlier, can be seen in map no. 123. The map was engraved by Friedrich van Wissel. |
then the Information section in the Item Details display for this item would look like this:
Information: This map was described in an article entitled Explorer’s
Maps in the Golden Age of Discovery that was published in the festschrift Josef
Hofnägel – 50 Years of Geographical Glory.
Another copy of this map, but one not published in the festschrift, but rather
three years earlier, can be seen in map no. 123.
The map was engraved by Friedrich van Wissel.
There are six types of special hyperlink that you can insert into segments of text in one-line and multi-line text fields. All of these will appear as blue-underlined text in the Item Details view, just like the jump-to links described earlier. However, the behavior of five of these six, when you click on these special hyperlinks, differs from the behavior of jump-to links (which take you to a new record in the Item Details display). Two of the kinds of special hyperlink, when clicked on, open up a web browser onto a particular web page (URL). A third kind of special hyperlink causes a small extended information window to open at the bottom of the Item Details view, and additional information related to the clicked-on text is displayed there. A fourth kind of hyperlink opens up Windows Media Player and plays an audio or video clip when the link is clicked on. A fifth kind of hyperlink opens up a file with whatever application is associated with it. The sixth kind of special hyperlink is just a variant of the jump-to link described earlier. But, unlike the jump-to link described earlier, this special hyperlink allows you to have the visible text of the hyperlink be something other than the ID number of the destination record.
These six kinds of special hyperlink are referred to as W-links, P-links, X-links, R-links, M-links and F-links. (The letters refer to the codes that the program embeds in the text to identify these various kinds of hyperlinks, but the letters aren’t visible.) The following table summarizes these six types and shows what happens when the user clicks on one of these links displayed on an Item Details page:
|
Link Code |
Link Type |
Click Behavior |
|
W |
Web hyperlink (full URL) |
Opens the user’s default web browser and displays the target web page. |
|
P |
Web hyperlink (URL pattern with parameters) |
Opens the user’s default web browser and displays the target web page. |
|
X |
Footnote-style extended information |
Displays the extended information in a footnote panel at the bottom of the Item Details window. The same information is also displayed in a pop-up pane if you hover over the link. |
|
R |
Jump-to hyperlink |
Jumps to the Item Details view for the record associated with this hyperlink. |
|
M |
Media link |
Opens Windows Media Player and plays the associated audio or video clip. |
|
F |
Associated file |
Opens the appropriate application on the specified file. |
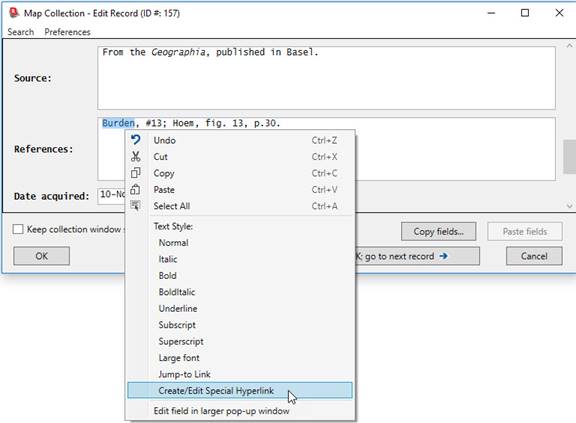
To create a new special hyperlink, select the text that you want to become the visible link. Or, if that text doesn’t already exist, enter the desired text into the text field where you want the link to appear, and then select that text. Right-click on the selected text and choose Create/Edit Special Hyperlink from the options menu:
This will bring up the Special Link dialog:
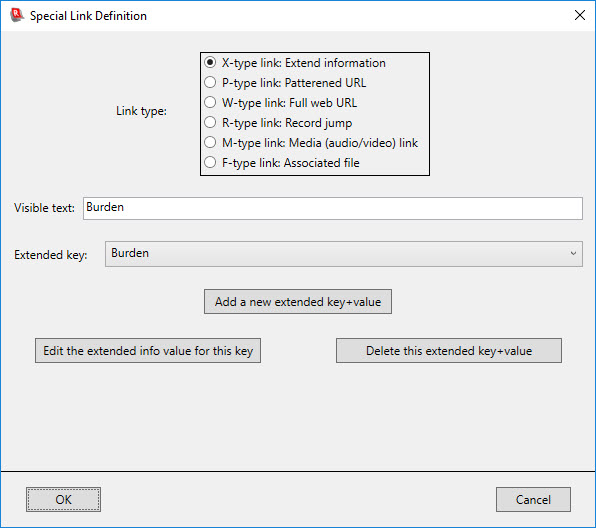
The dialog shows the text that will become the user-visible hyperlink. (You can edit the visible text here, if you want, and it will be changed in the original text edit field when you return from this dialog.) Click one of the six radio-buttons at the top to select the kind of link you want to create.
X-links (extended information)
If you are creating an X-link (footnote-style extended information), then you simply need to use the drop-down list to choose the key associated with the extended information text. If you have not yet created a new key and value for the desired extended text, click on the Add a new extended key+value button. This will bring up the following dialog:

Fill in the two text fields, providing a key and the extended text. For example, the filled-in dialog might look like this when completed:
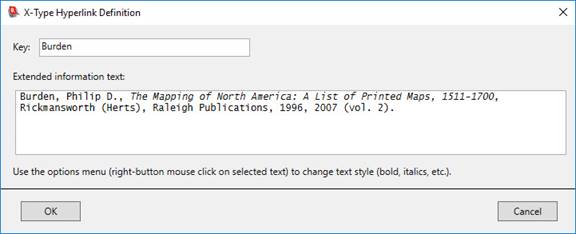
Note that in this example the key chosen (“Burden”) happens to be the same as the visible text (see earlier illustration). This is not required, but it is both sensible and convenient to choose keys (for both X-links and P-links) that match the associated visible text. It is particularly convenient because when you invoke the Special Link dialog, the program examines the provided visible text, and it then searches the already-created X-link and P-link keys, looking for a key that is likely to be the intended association to the visible text. If it finds a likely key, the dialog is initially shown specifying that key. This makes creating new links on existing X-link and P-link keys very quick, since the Create Special Link dialog will be pre-set to the correct settings. For the X-link case, you need only click the OK button. (As described below, for the P-link case you will need to specify the parameter values and then click OK.) When generating printed reports, there is an option to include a list of references as an additional section of the report. This refernce list is generated from the X-links found in the information printed in the main part of the report, but it is limited to those X-links for which the visible text matches the key. This is another good reason to choose keys which match the visible text.
Note also that you can use formatting within the extended information text. This is done by selecting text and bringing up the options menu (by right-clicking with the mouse) to choose a text style. This gives you the same formatting capabilities (excluding jump-to links and hyperlinks) that are described earlier on this page for formatting text in text fields. In the extended information example shown here, the title of the book has been set in italics. When the user clicks on the extended-information hyperlink, the following footnote-style display will be shown at the bottom of the Item Details window:

The extended information can also be seen by simply hovering your mouse over the hyperlink in the Item Details page:

If you are working with an X-type link using an already-existing key (by choosing an existing key from the Extended Key dropdown list), two additional buttons will appear that let you modify the extended text (Edit the extended info value for this key) or delete the extended information key and value (Delete this extended info key+value).
P-links (web hyperlinks using a URL pattern)
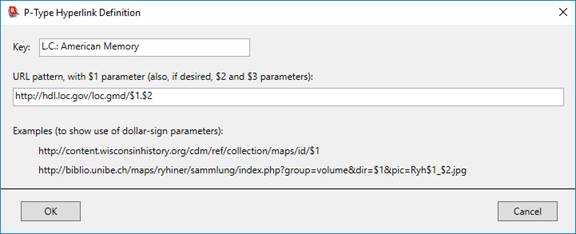
Creating P-type links is very similar to creating X-type links, except that in addition to specifying a key, you must also specify any required parameters. For example, suppose you had created the following pattern for a P-type link to the web pages at the Library of Congress’s American Memory web site:
If you are editing a multi-line text field that has the following contents:

you can select the Library of Congress – American Memory section of this text and then right-click and choose Create/Edit Special Hyperlink from the options menu. Click the P-type link: Patterned URL radiobutton, and choose LC – American Memory from the dropdown list. After these steps the dialog will look like this:
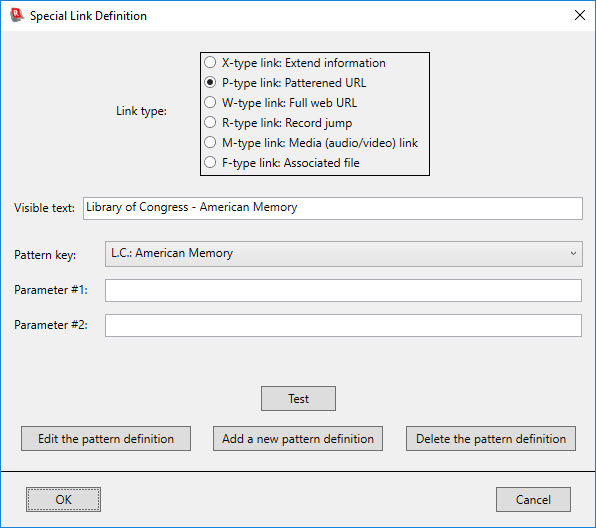
Note that there are two parameters that need to be provided. This is because the corresponding pattern uses two parameter placeholders ($1 and $2). The completed dialog might look like this:
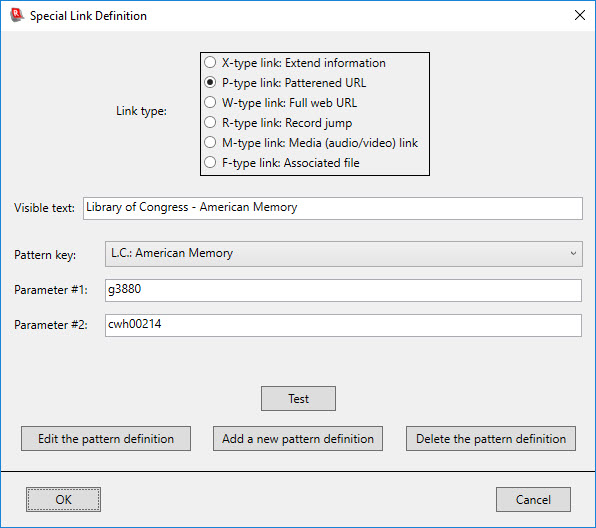
(This example would ultimately result in the following URL being sent to your web browser when you click on the associated hyperlink in the Item Details window: http://hdl.loc.gov/loc.gmd/g3880.cwh00214.)
To verify that you have provided parameters that work, and that take you to the desired web page, click the Test button. This will construct the full URL and open a web browser on that destination page.
The Edit the pattern definition button and the Delete the pattern definition button allow you to modify or eliminate existing P-type link patterns. Select the pattern key that you wish to modify or delete from the Pattern key dropdown list, and click on the appropriate button.
W-links (web link with a fully specified URL)
To create a W-type link, select the W-type link: Full web URL radiobutton. For W-type links you simply enter the full URL into the URL field. Make sure that a full URL (beginning with http:// or https://) is specified.
The W-link screen includes a Test button that lets you open a web browser on the typed-in URL, to ensure that you are providing a working link to the desired page.
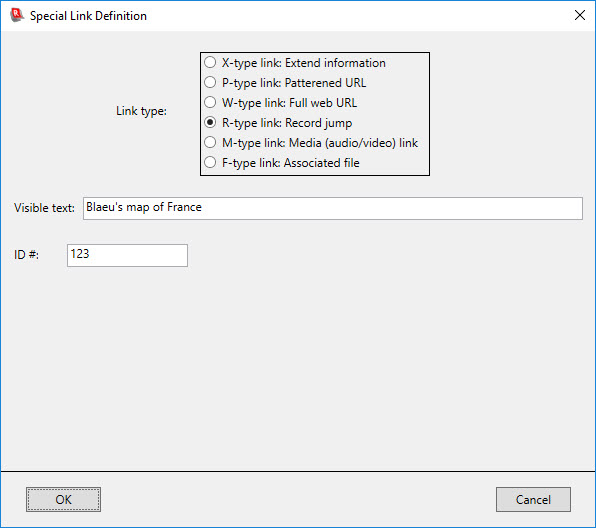
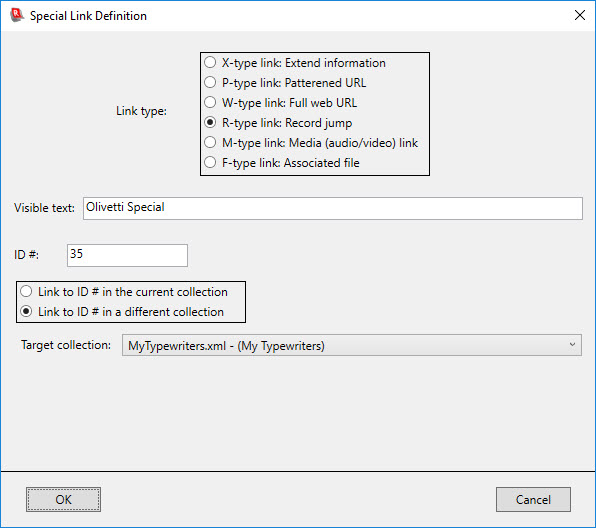
R-links (record jump link)
To create an R-link, select the R-type link: Record jump radiobutton. Then enter the ID # of the desired destination record:
If
you have other collections that reside in the same directory as the current
collection, the dialog will have additional controls that allow you to specify
that the destination of the link is a record in a different collection:
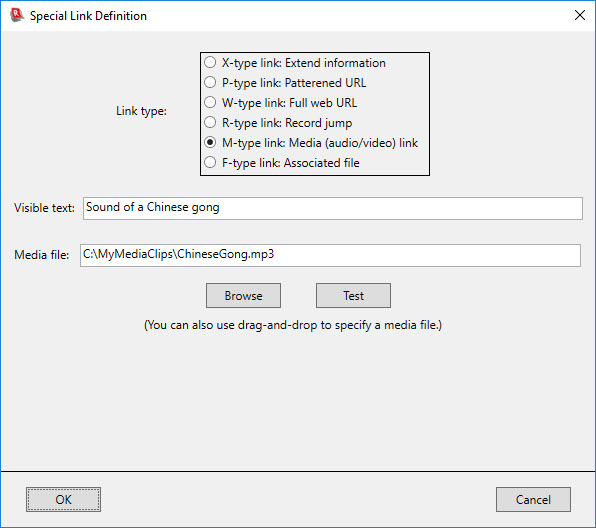
M-links (media [audio/video]
links)
To create an M-link, select the M-type link: Media (audio/video) link radiobutton. Then enter the full pathname of the audio or video file that you want played when the link is clicked on. You can more easily provide the file name by clicking the Browse button and then navigating to and selecting the desired media file. You can also use drag-and-drop, by selecting a file in a Windows Explorer window, dragging it to the Special Link Dialog and dropping it into the Media file text-entry box.
Note: If your media file is located in the collection’s Image Directory folder, you can provide the simple file name, without the complete path. For example, if your Image Directory contains the file named SampleSong.mp3, you can simply specify SampleSong.mp3 as the Media file value, rather than having to specify a full path name (such as C:/MyCollection/Collection_Images/SampleSong.mp3).
Once you have specified a media file, you can use the Test button to verify that Recollector will do the right thing when the link is clicked on. The Test button performs the same action that will be performed when you click on the resulting hyperlink in the Item Details view.
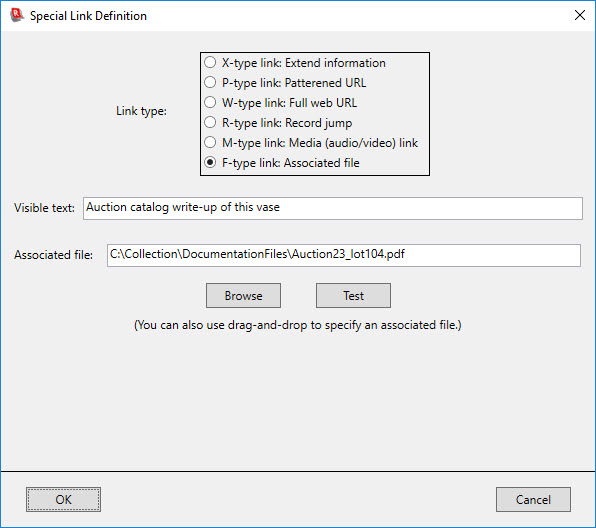
F-links (links to associated files)
To create an F-link, select the F-type link: Associated file radiobutton. Then enter the full pathname of the associated file. You can more easily provide the file name by clicking the Browse button and then navigating to and selecting the desired media file. You can also use drag-and-drop, by selecting a file in a Windows Explorer window, dragging it to the Special Link Dialog and dropping it into the Associated file text-entry box.
Note: If the associated file is located in the collection’s Image Directory folder, you can provide the simple file name, without the complete path. For example, if your Image Directory contains the file named Auction23_lot104.pdf, you can simply specify Auction23_lot104.pdf as the Associated file value, rather than having to specify a full path name (such as C:/MyCollection/Collection_Images/Auction23_lot104.pdf).
Once you have specified an associated file, you can use the Test button to verify that Recollector will do the right thing when the link is clicked on. The Test button performs the same action that will be performed when you click on the resulting hyperlink in the Item Details view.
Editing
existing special hyperlinks
You can edit an existing special hyperlink selecting part of the coded text string and then right-clicking and choosing Create/Edit Special Hyperlink from the options menu. This will bring you back into the Special Link dialog, with all the fields filled in. Make whatever changes you like and click OK.
You can also remove an existing hyperlink by selecting part or all of the hyperlinked text in the editor, and then right-clicking and choosing Create/Edit Special Hyperlink from the options menu. In this case you will see an additional button at the bottom of the dialog: Remove link: revert to simple visible text. Click this button to remove the hyperlink:

As with the special formatting capabilities described earlier, the Special Link dialog is only accessible from one-line and multi-line text editing fields (via the right-click options menu). It is not available for short-text, image, numeric, dimension, date, or currency fields, or for one-line text fields associated with a picklist.
Editing Data
Editing data is exactly like adding data, except that the data-entry window will appear with current information already filled in:
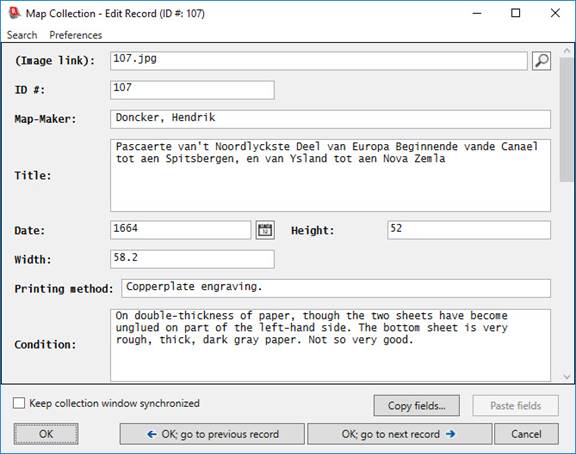
Any changes you make will be applied to the data fields when you click OK. Alternatively, you can click on OK; go to previous record or OK; go to next record and the data-editing window will stay in place, but the contents will be changed to reflect the prior or subsequent data record of the collection window. In any of these cases, the changes made in the data-entry window will be immediately reflected in the collection window.
When you go to the previous or the next record in the data-editing window, the collection viewer window’s contents does not normally change. However, if you turn on the Keep collection window synchronized check box, then the collection viewer window will track the data-editing window, and it will change to the previous or next record as you change to the previous or next record in the data-editing window. This can be particularly useful if the collection viewer window is displaying Item Details, and your records include images. By keeping the windows synchronized, you can add or edit information in the data-editing window while you are looking at the same record, including its thumbnail images, in the collection viewer window. Note that even if you have turned the Keep collection window synchronized check box on, you can still go to the collection viewer window and request to see a different record than the one currently displayed; this will not cause the record shown in the data-editing window to change. The synchronization only works in one direction: When you change to a new record in the data-editing window, the collection viewer window’s record will switch, if necessary, to show the same record.
When editing data, the title-bar of the window will show the ID # value for the record being edited. This allows you to keep track of which record you are editing, even if you have scrolled the display such that the ID # field is no longer visible.
The data-entry window has a Search menu, with Find and Find Again menu choices. This provides an easy way to quickly locate a particular word or phrase that you know is at or near the place where you want to make some editing changes. The search is performed across all fields in the record: If necessary, the data-entry window will automatically scroll (and long-text fields will automatically scroll), so that the next occurrence of the desired word or phrase is visible. The found text will be highlighted. An option is provided to let your search be case-dependent or case-independent. If the searched-for text occurs more than once in the record, doing a Find Again will move on to the next occurrence in the same record, wrapping back to the first field when the last field has been searched. Searching does not include the values shown in fields with a picklist.
Notes:
- The data-entry window does not need to be closed before going back to the collection viewer window to view your collection. However certain operations accessible from the collection viewer window (for example, deleting records) are not allowed while the data-entry window is open. If you attempt to perform one of these disallowed operations, the program will prompt you to close the data-entry window and then re-try the desired operation.
- If the data-entry window is open but not visible (hidden behind other windows), you can bring it to the front by choosing Data Adding/Editing Window from the Windows menu of the associated collection viewer window.
- Because you can access the collection viewer window while the data-entry window is still open, you can utilize the ability to copy text from the Item Details view in the collection viewer window, and then paste it into the data-entry window. This is useful, for example, if you have two items in your collection that are very similar, and you want to utilize the information you entered for one item while creating the record for the second item. Go to the record you want to use as a model and display it in the Item Details view. Then request to add a new record (by clicking the New Record button or by choosing Add New Record(s) from the Edit menu). You can now copy text for a field from the Item Details view of the collection window and paste it into the corresponding field in the data-entry window.
- Since you can have more than one collection open at the same time, you can also have multiple adding/editing windows open simultaneously. If you are in doubt as to which editing window goes with which collection window, choose Data Adding/Editing Window from the collection window’s Window menu. This will bring that collection’s adding/editing window to the front.
Back to: Defining a New Collection
Back to: Recollector - Home Page